
 Support
RentPackage Add a Self-Managed Property: Paste all the units of the home you rent out at once, then sign leases and collect rent
In this article
Why set up the properties you rent out in RentPackage
Units, rent and tenants are kept in Excel or a notebook, and every month you have to work out who owes how much, record who has paid and chase who hasn't; with more units, it's easy to miss one.
- Create all units at once
One unit and one rent per line: copy and paste from Excel and set up a dozen units in one go. - Bring in your current tenants too
Paste tenants, lease terms and deposits on the same screen. The system automatically creates every billing period from the current one on, so you don't have to enter past bills. - Sign leases and collect rent right away
Once the property is created, add a lease directly: billing periods are created automatically and rent reminders are sent automatically. No more calculating, remembering or chasing yourself.
Before you start: choose [Self-Managed Landlord]
Click [Add Property] at the top right. If you own the property and sign leases and collect rent from tenants yourself, choose [Self-Managed Landlord], then click [Add Property].

If you manage properties for owners, lease and sublet, or only find tenants, see:
Don't want to enter it step by step? Let the AI Assistant set it up for you
If you already have the unit and tenant details, just paste them to the AI Assistant. Click [Support] at the bottom right, choose [Add a property for me], and paste the address, units and rent; for occupied units, also paste the tenant, lease term and deposit. The AI Assistant first lists what it will create so you can check it. Click [Confirm and create] and the property, units and leases are set up together, and every billing period for occupied units is generated automatically.
Steps
Step 1: Enter the property and rental units
- Rental Property Name: A name that's easy for you to recognize, such as the building or street name.
- Address: The property's actual address, which is filled into leases automatically later.
- Add Rental Unit: One unit per line, with the unit and rent separated by a comma, e.g. 101, 5000. A room, parking space or storefront can each be a unit; you can paste many lines from Excel at once, and any mistake is marked with its line number.
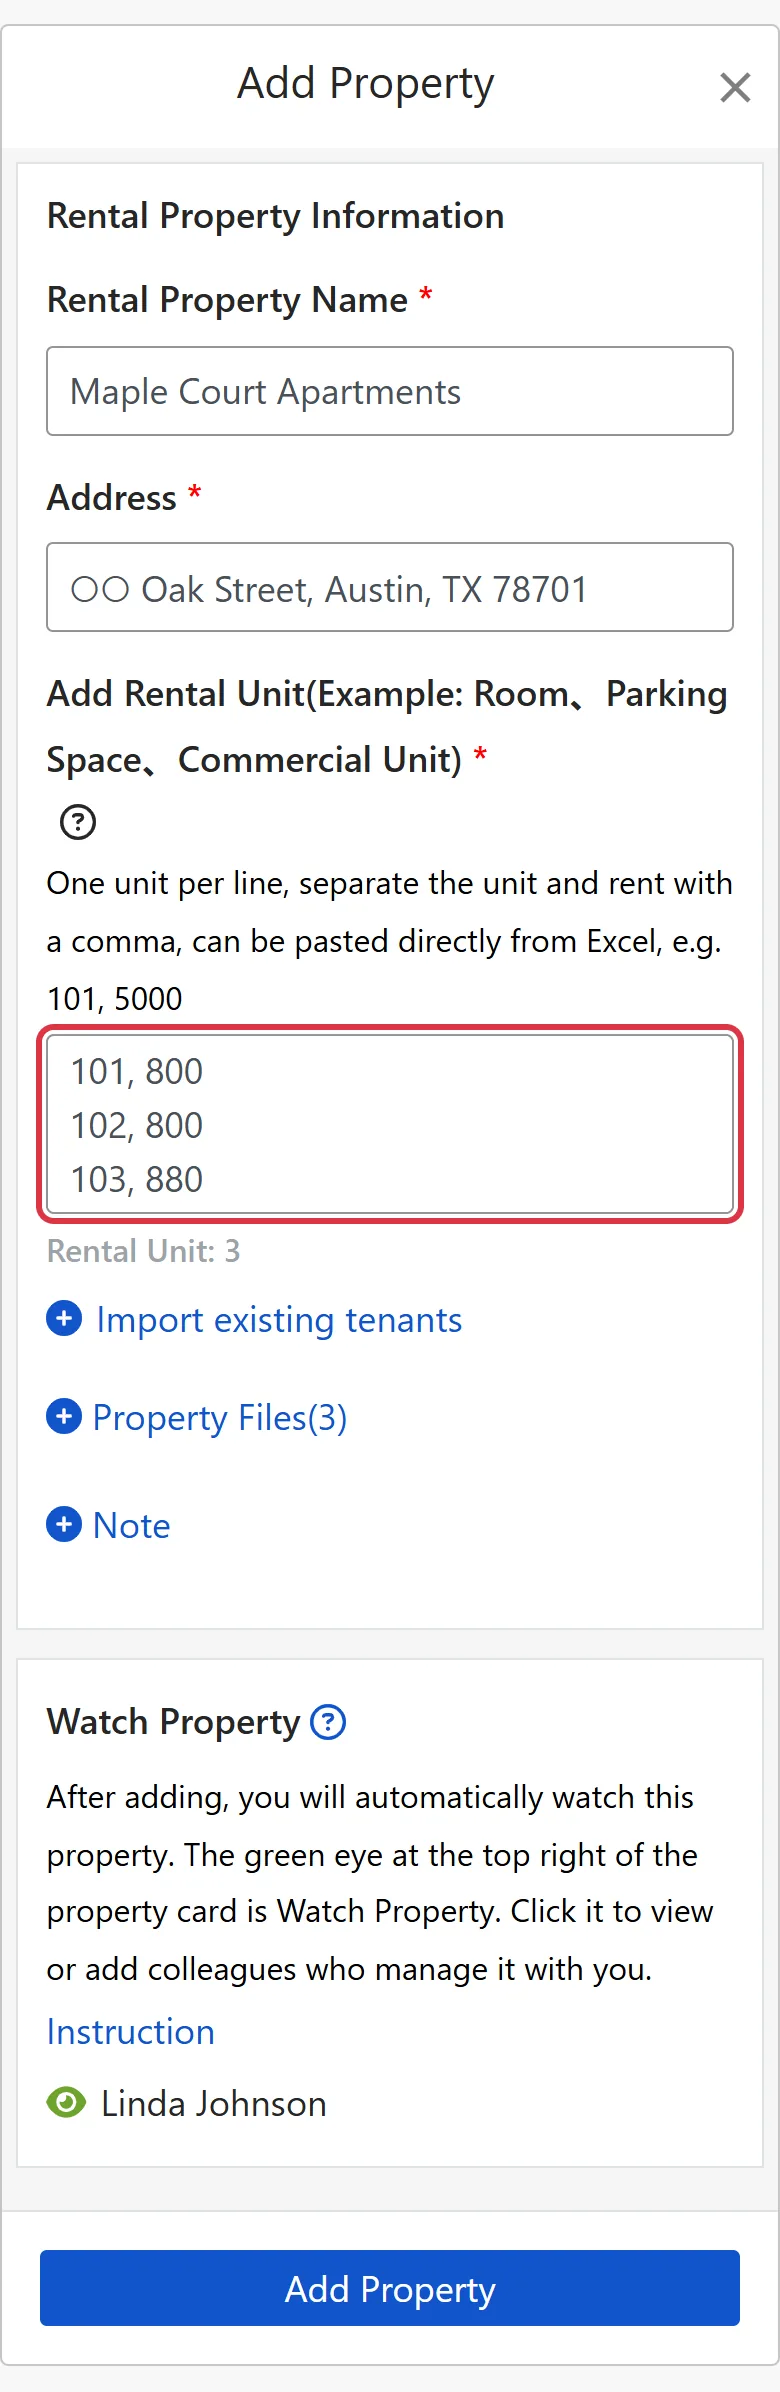
Step 2 (optional): Import existing tenants
For units that are already occupied with a signed lease, click [Import existing tenants] below the input box and continue the same line with the tenant details: Rental Unit Name, Rent Price, Tenant name, Tenant Email, Lease Start Date, Lease End Date, Security Deposit, separated by commas, e.g. 101, 1500, John Smith, [email protected], 2026-03-01, 2027-02-28, 1500.
The system creates billing periods starting from the current period, not past ones; if the current period has already been paid, just use Mark as Received after setup. Choose whether to send payment reminders to tenants under [Alert recipients]; rent reminders are sent starting from the next period.
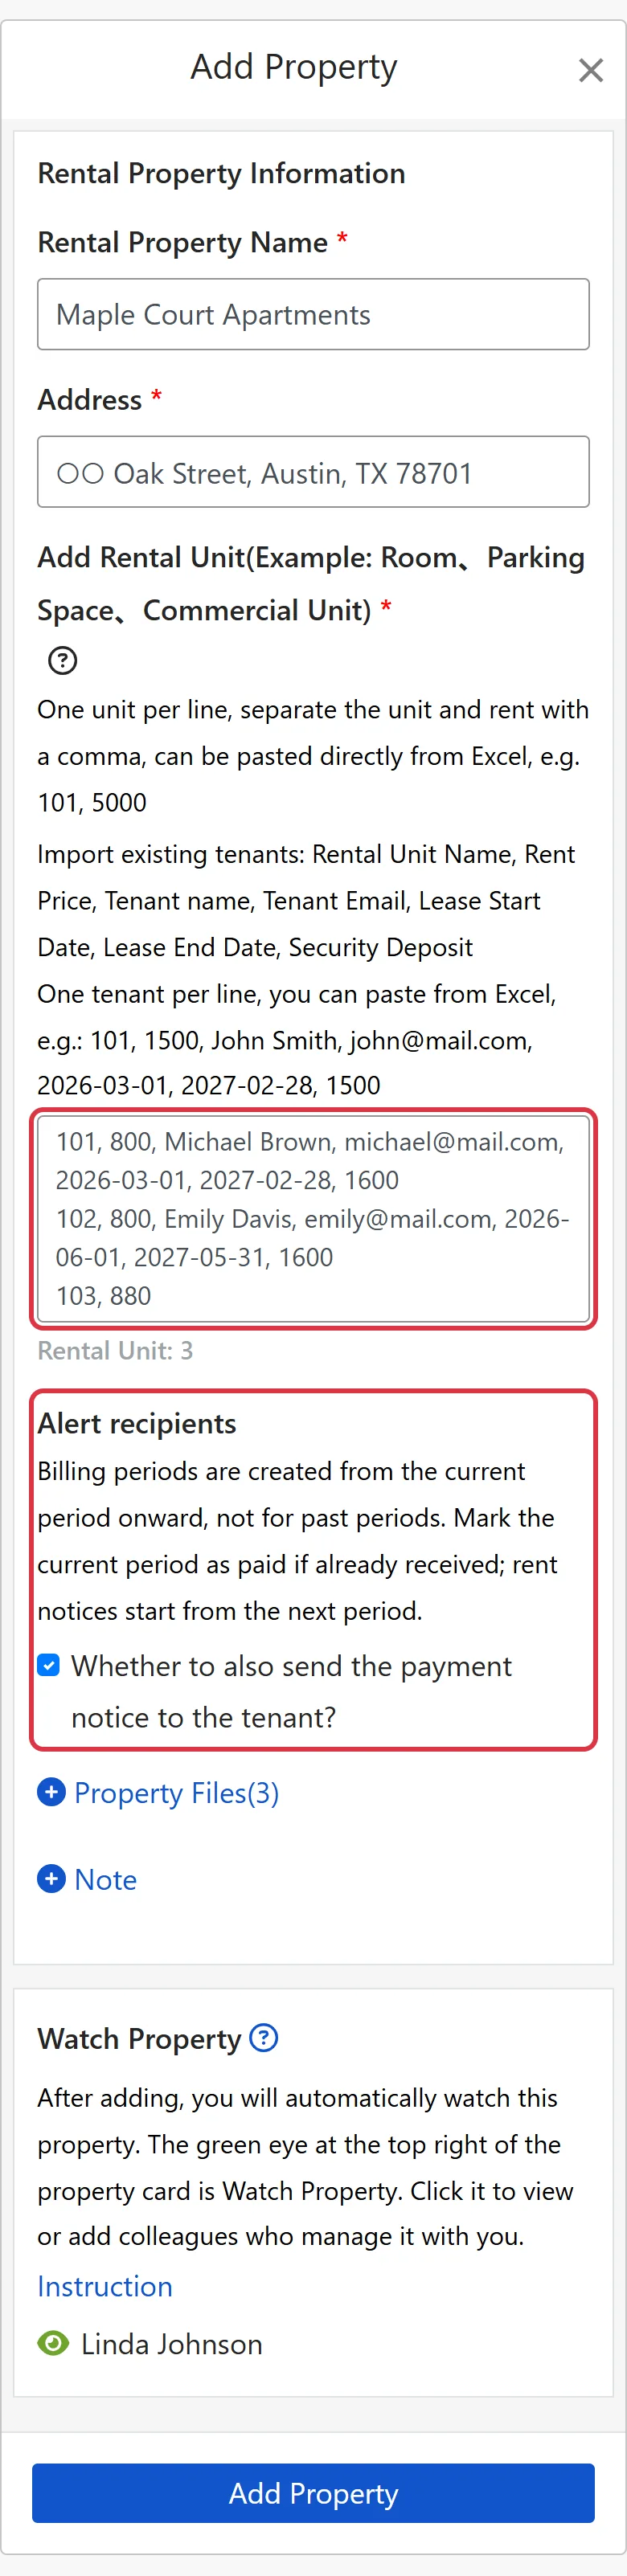
Step 3: Other fields, then click [Add Property]
- Property Files: Click [+ Property Files] to expand it and upload PDF documents (up to 3), such as the title deed or a paper lease you've already signed. This feature is available on the Advanced plan only.
- Note: Click [+ Note] to expand it and add extra details (up to 1500 characters).
- Watch Property: Once the property is added, you automatically watch it. The at the top right of the property card is Watch Property; click it to view or add colleagues who manage it with you.
When everything is correct, click [Add Property] at the bottom.
What will you see after completion?
If you didn't import any tenants, the system shows “Your property and units are all set! Final step: Add Lease” when you return to the property page. Click [Start Adding a Lease], choose a unit, and fill in the tenant, lease term and rent.
If you imported existing tenants, their tenant leases are already created and their billing periods already generated, so you'll see them when you return to the property page. Any units that couldn't be imported are listed in the error message; you can add them from the property card via [More Actions] (⋯) > [Properties] > [Import existing tenants].
To add a lease later, click [...] to the right of the rental unit and choose [Add Lease]. Once the lease is complete, the system automatically creates billing periods, organizes your to-dos and sends notifications based on your settings.
FAQs
Do I need two accounts for my own properties and the ones I manage for others?
No. One account can hold Self-Managed, Property Management Service, Sublandlord and Leasing Only properties at the same time; just choose based on each property's situation when you add it.
The tenant has already lived there for months. Do I need to enter the past bills?
No. When you import existing tenants, the system creates billing periods starting from the current period, not past ones. If the current period has already been paid, just use Mark as Received after setup.
How do I change the name or address, or add units, after the property is created?
On the property page, click the property name, or click [More Actions] (⋯) > [Properties] on the property card, then choose [Edit Property] or [Add Rental Unit].
Summary
With your current method, next month you'll still open Excel, work out the rent unit by unit, record who has paid and chase who hasn't. Once your properties are in RentPackage and leases are added, billing periods are created automatically and rent reminders are sent automatically; open the property page and you'll see which units haven't paid yet.
Start with one property: create it and its units, and give it a try.
Try RentPackage for freeRelated articles
- RentPackage Add Lease: Set the lease term, deposit and utilities in one go, and billing periods are generated automatically.:Once the property is created, add a tenant lease and billing periods are created automatically.
- Tenant Billing Periods:After billing periods are created, how to mark them as received, edit them and send payment reminders.
- AI Assistant Pach:Paste your data to the AI Assistant and set up the property, units and tenants in one go.