
Custom rental notifications: rent reminders, lease expiration, sent to the right person at the right time
Quick Links
- What can Custom Notifications do for you?
- What can it be used for? Five practical scenarios
- Step 1: Basic Settings
- Step 2: Notification Conditions
- Step 3: Notification Content
- Step 4: Preview and Save
- View sent tenant notifications history
- What do sent emails look like? Each person receives their own version.
- FAQ
What can Custom Notifications do for you?
Lease management involves many 'time-sensitive notifications': reminding colleagues to discuss renewal when a lease is nearing expiration, notifying tenants, reminding to renew insurance, sending rent adjustment notices annually. Custom Notifications let you create rules: when to send (trigger conditions), to whom (recipients and filters), and what to send (notifications with variables). Set it once, and the system will monitor contract dates and send automatically.
The key is personalized content: notifications include variables (e.g., tenant name, property name, contract start date) that the system replaces based on each recipient's contract data. One rule can be sent to a hundred tenants, and each receives a message with their own name, room, and dates, like handwritten, but fully automated.
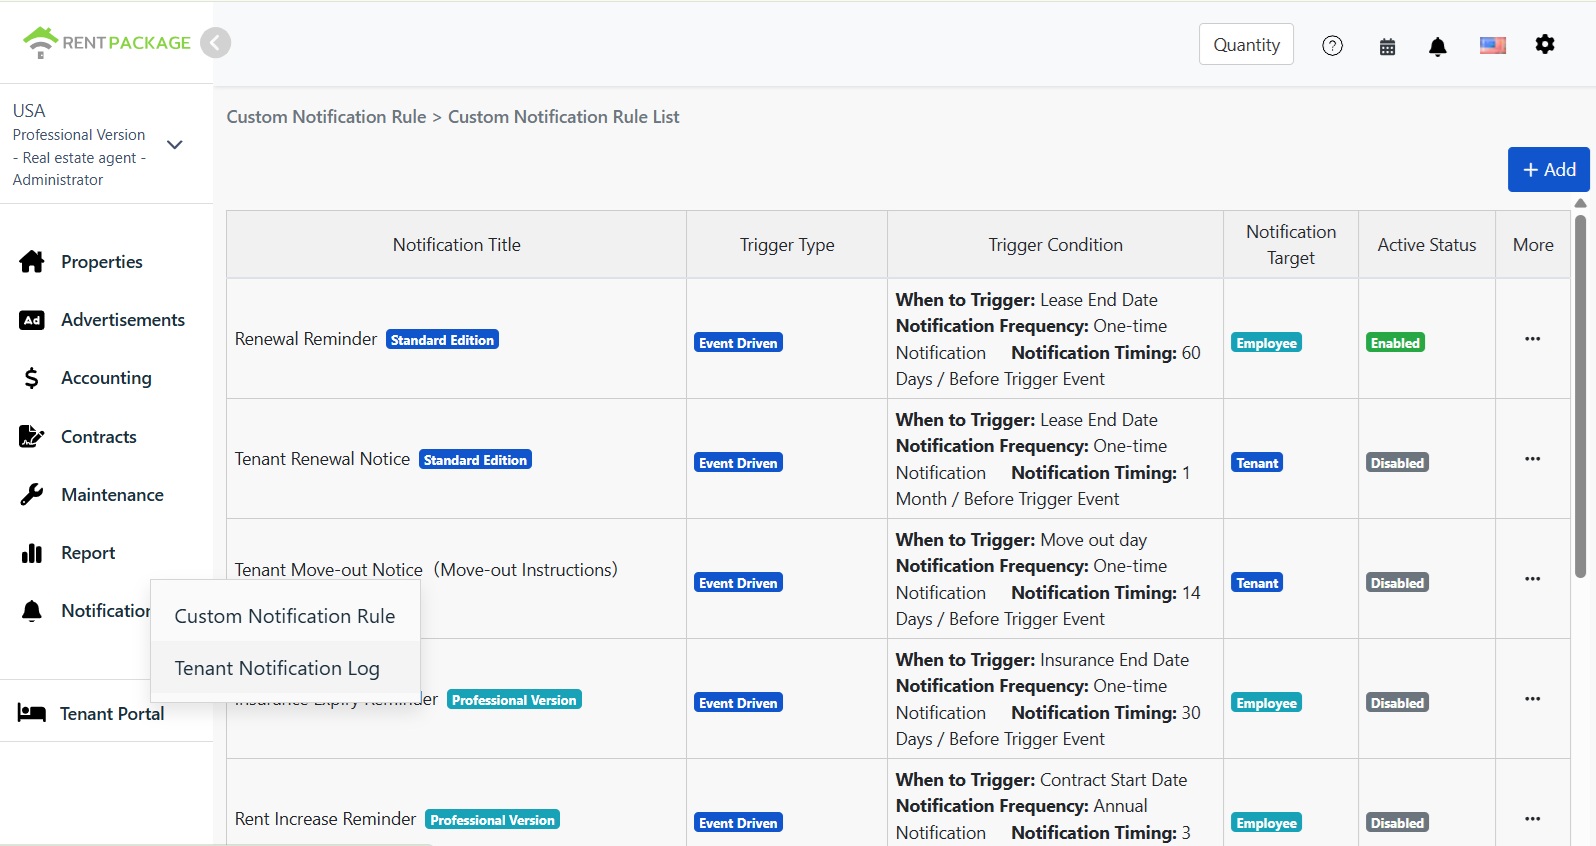
Access: Click 'Notifications' on the left menu, then select 'Custom Notification Rules'. The list shows built-in rules (such as renewal reminders, move-out notices, insurance expiry notices, rent adjustment reminders) ready for use; click 'Add' in the top right to create your own.
What can it be used for? Five practical scenarios
These are either built-in rules or ones you can set up in minutes:
| Scenario | Trigger Setting | Recipients |
|---|---|---|
| Remind staff to prepare lease renewal before expiration | Lease end date, 60 days before expiration, send once | Staff |
| Notify tenant before lease expiration | Lease end date, 1 month before expiration, send once | Tenant |
| Send move-out instructions to tenant before vacating | Move-out date, 14 days prior, send once | Tenant |
| Remind to renew rent insurance before expiration | Policy end date, 30 days before expiration, send once | Staff |
| Send annual rent adjustment notice each year | Annual notice 1 month before lease start date | Tenant |
Four Steps to Create a Rule
Step 1: Basic Settings
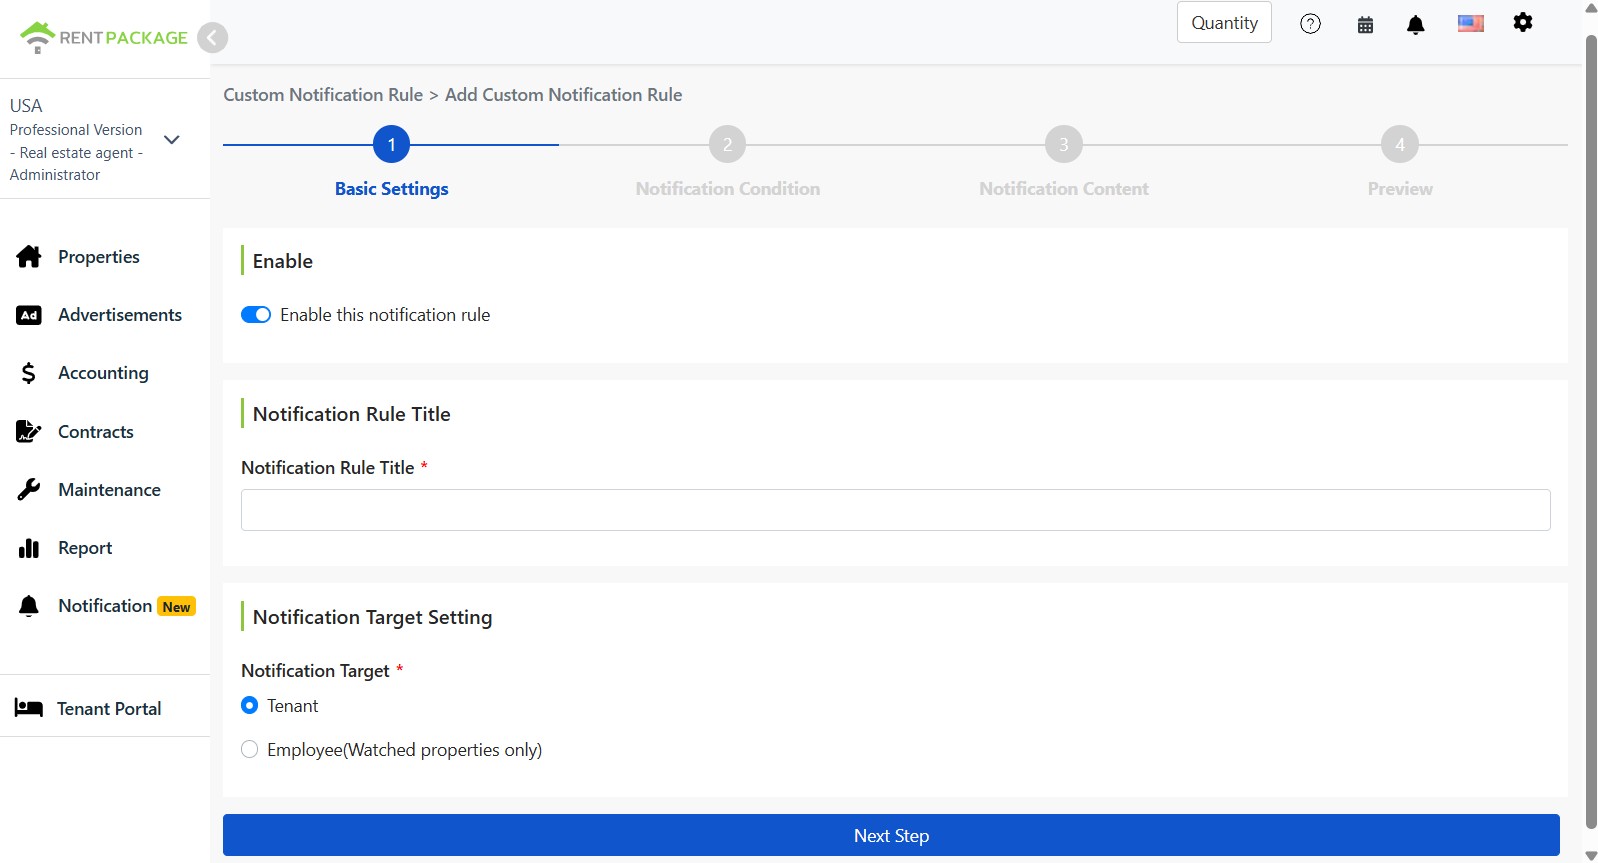
Enable the switch, give the rule a recognizable name, and choose recipients: Tenants (send to tenants with matching lease) or Staff (only notify staff monitoring the property, to avoid irrelevant notifications).
Step 2: Notification Conditions
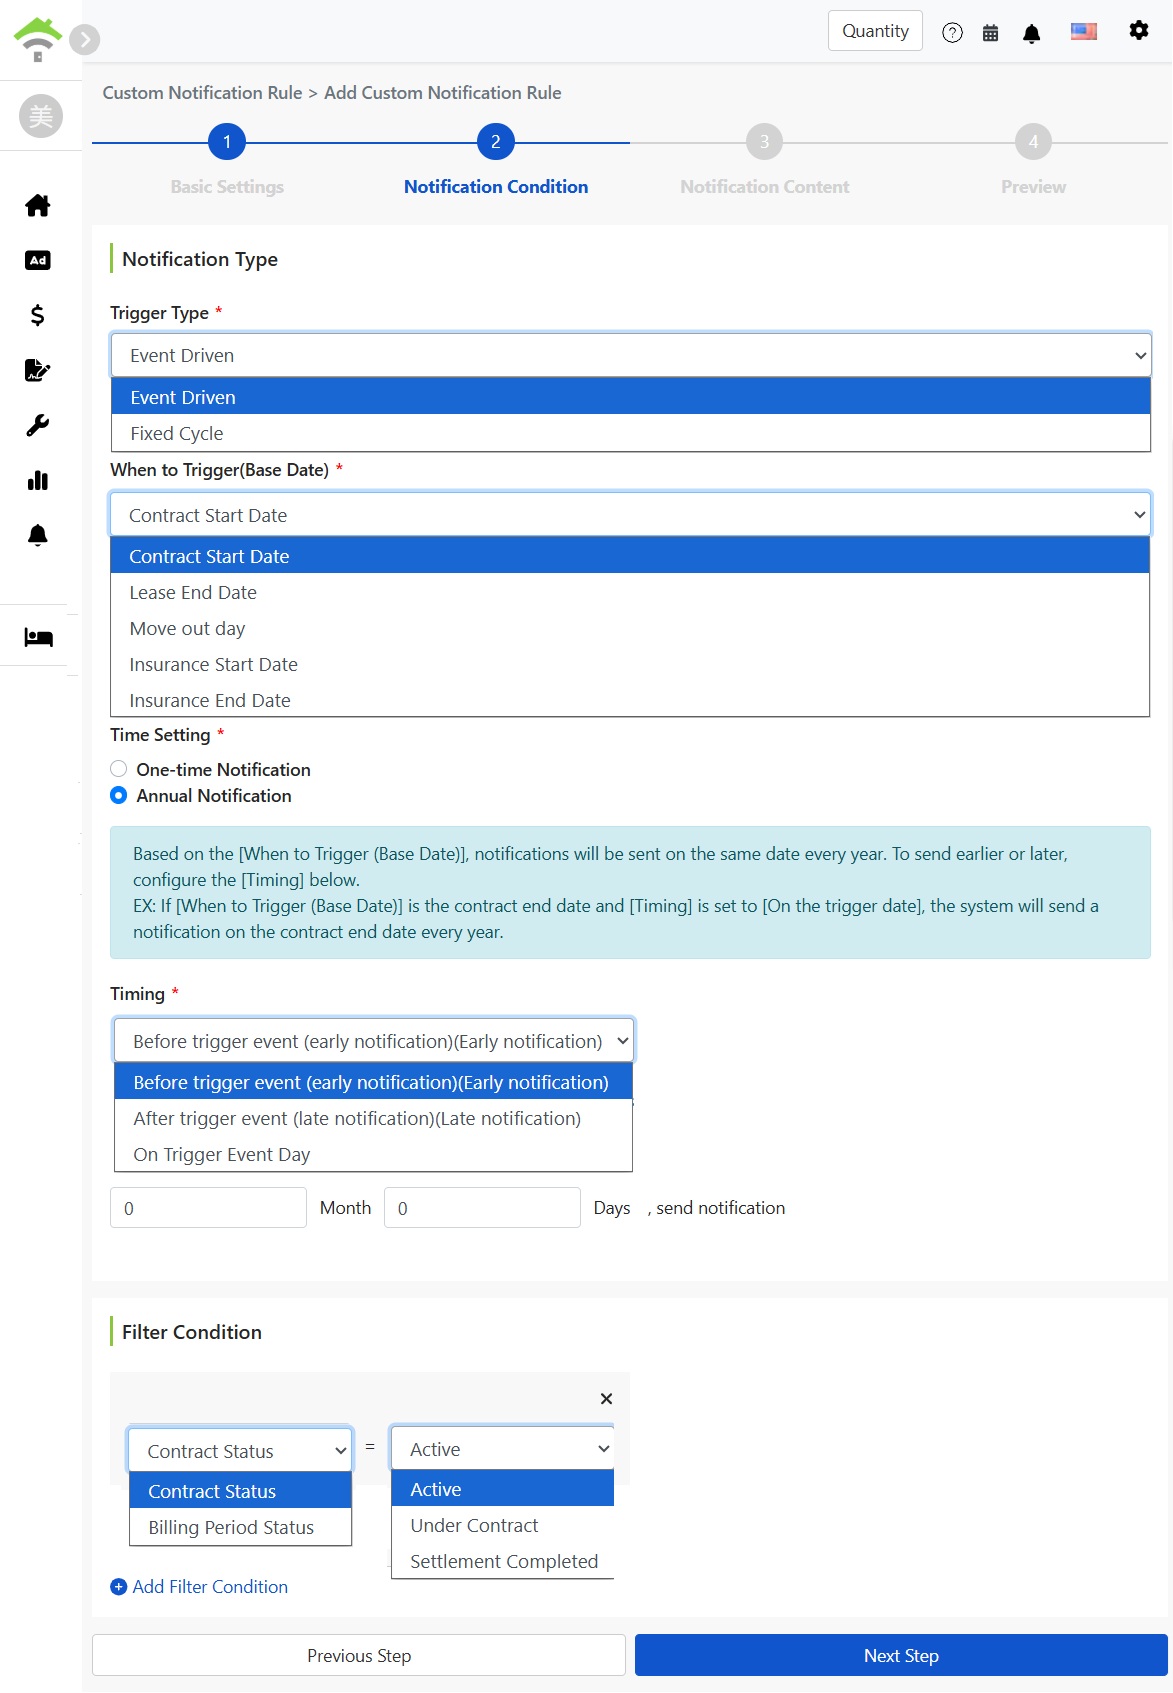
- Trigger Type: Event-driven (triggered based on contract dates, most common) or Fixed Cycle (sent periodically).
- Trigger Date Basis: Choose which date to base on: Lease Start Date, Lease End Date, Move-out Date, Policy Start Date, Policy End Date.
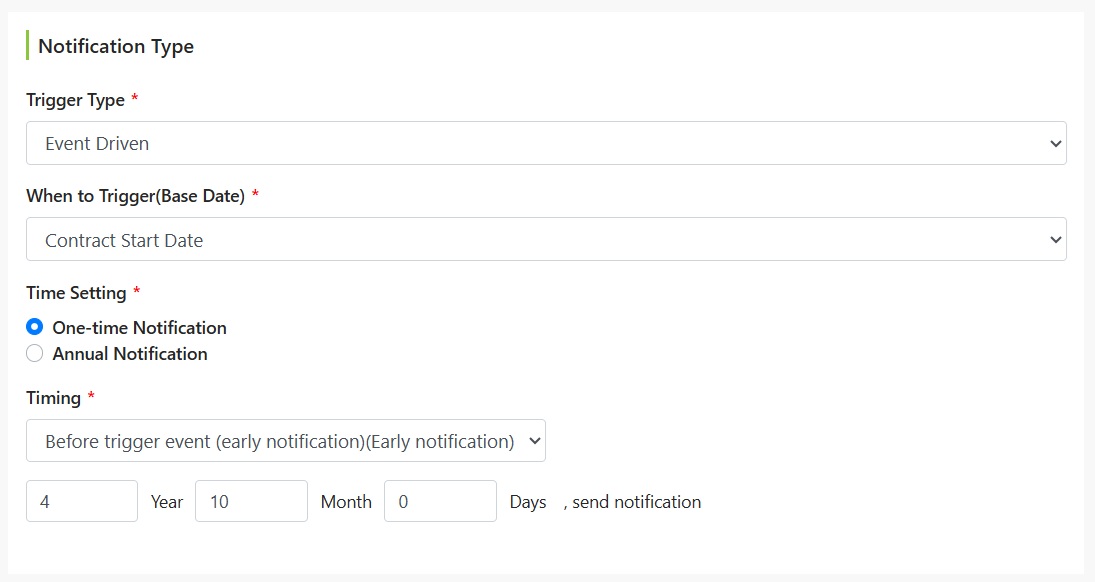
- Time Setting: Send once, or as annual notifications (based on the reference date, sent on the same day each year, suitable for annual rent adjustments).
- Send Timing: Before the trigger event (advance notice), after the trigger event (delayed notice), or on the day of the trigger event; set how much in advance or delay in years, months, days.
- Filter Conditions: Further specify which contracts apply to this rule, e.g., contract status is active, and add multiple conditions. Contracts that don't meet conditions won't receive notifications.
Step 3: Notification Content
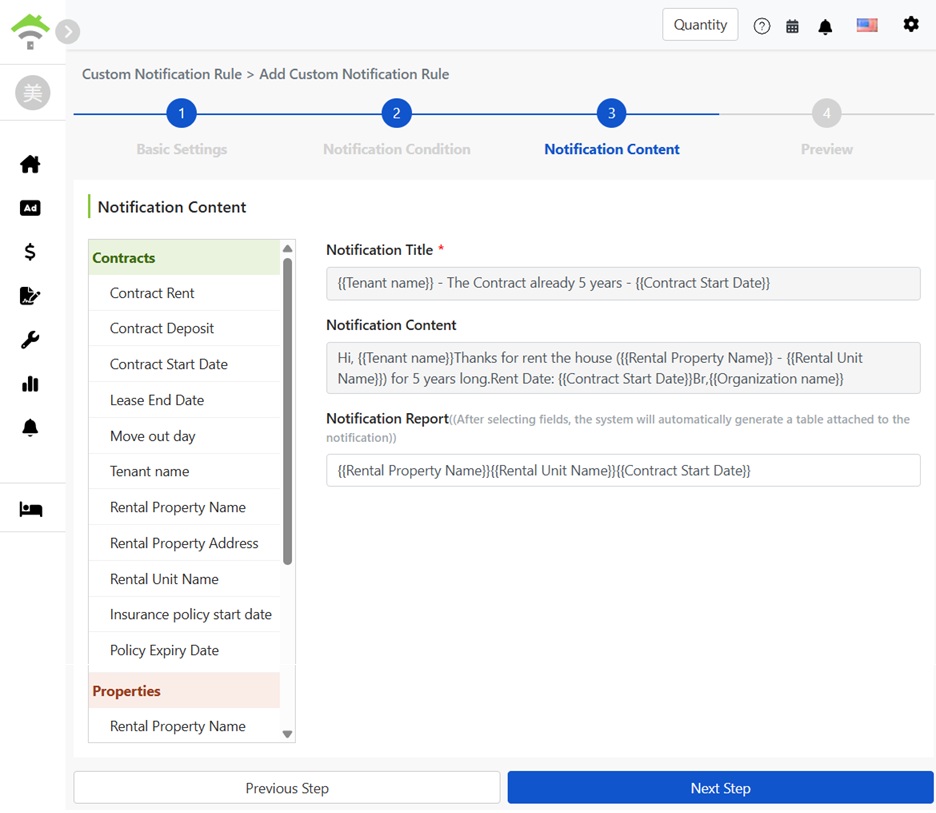
Draft notification title and content. On the left is a list of available data fields (categorized by contract, property, etc.). Click a field to insert it as a variable (displayed as double brackets, e.g., tenant name, property name, contract start date). Variables replace with recipient-specific data at sending. Both title and content can use variables.
Notification Report: Select a few fields, and the system automatically generates a table at the end of the notification, organizing these field details like property name, room, and contract start date in a row, so the recipient doesn't have to find information in the content.
Step 4: Preview and Save
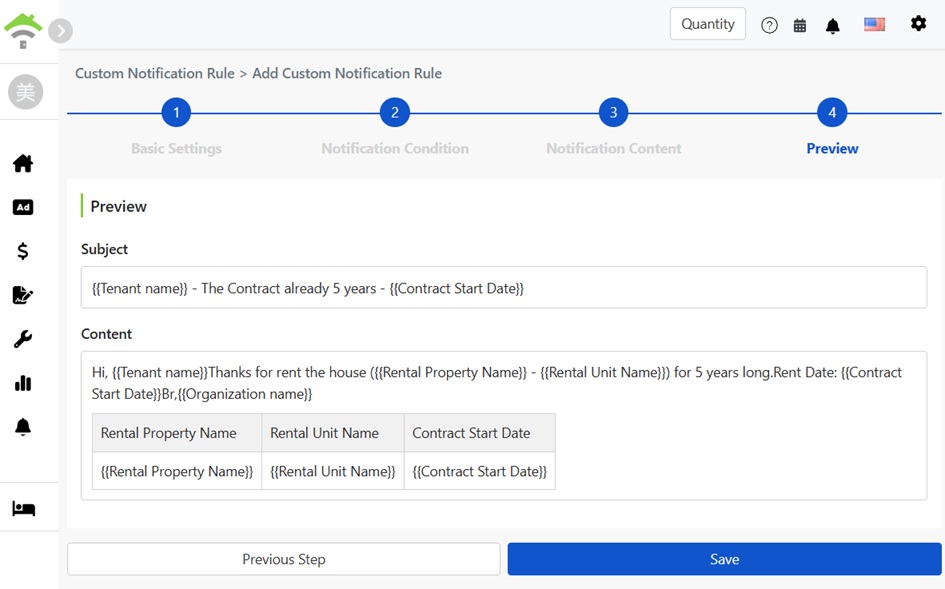
The preview will display the complete notification: Subject, Body, and Auto-generated Report Table, with variables shown in double curly braces. Click Save once all is correct.
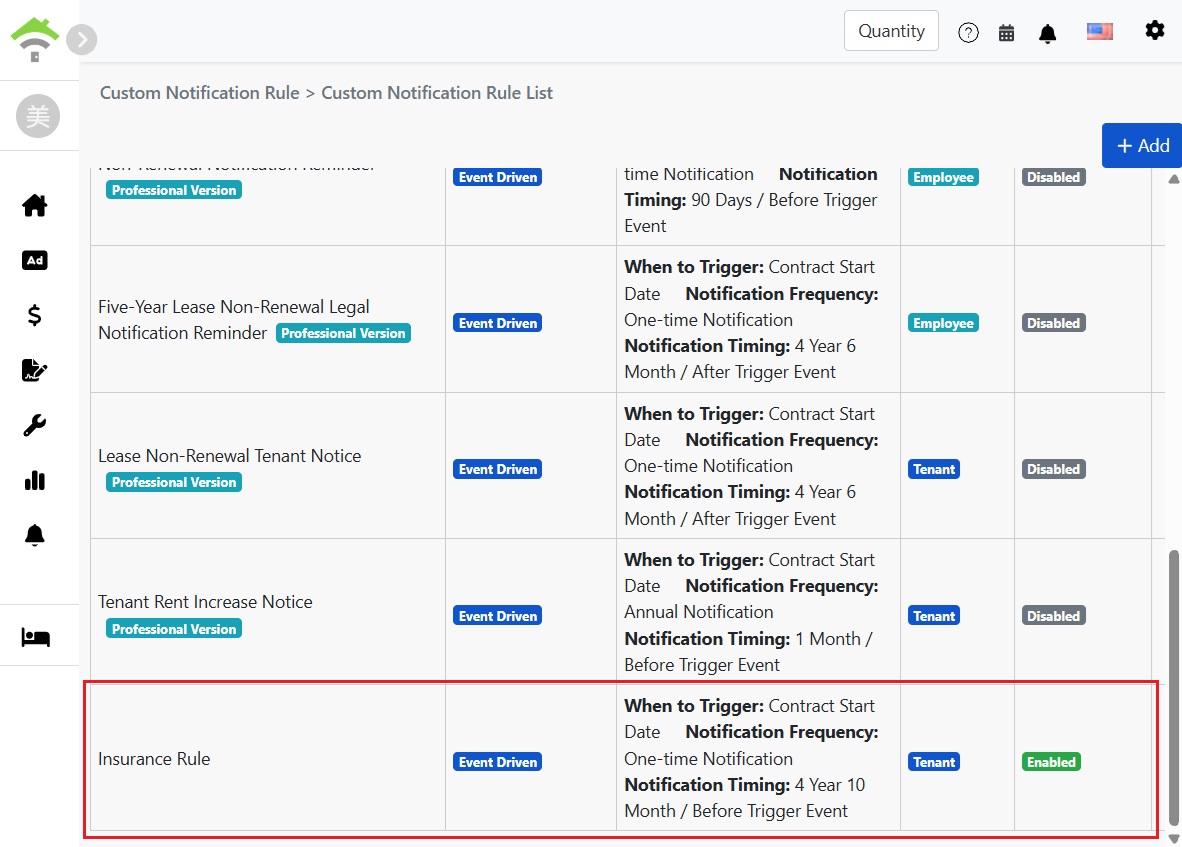
After saving, the rule appears in the list with a status of Enabled. Each rule on the list shows a summary of trigger conditions, notification recipients, and status. You can disable, edit, or delete at any time.
View sent tenant notifications history
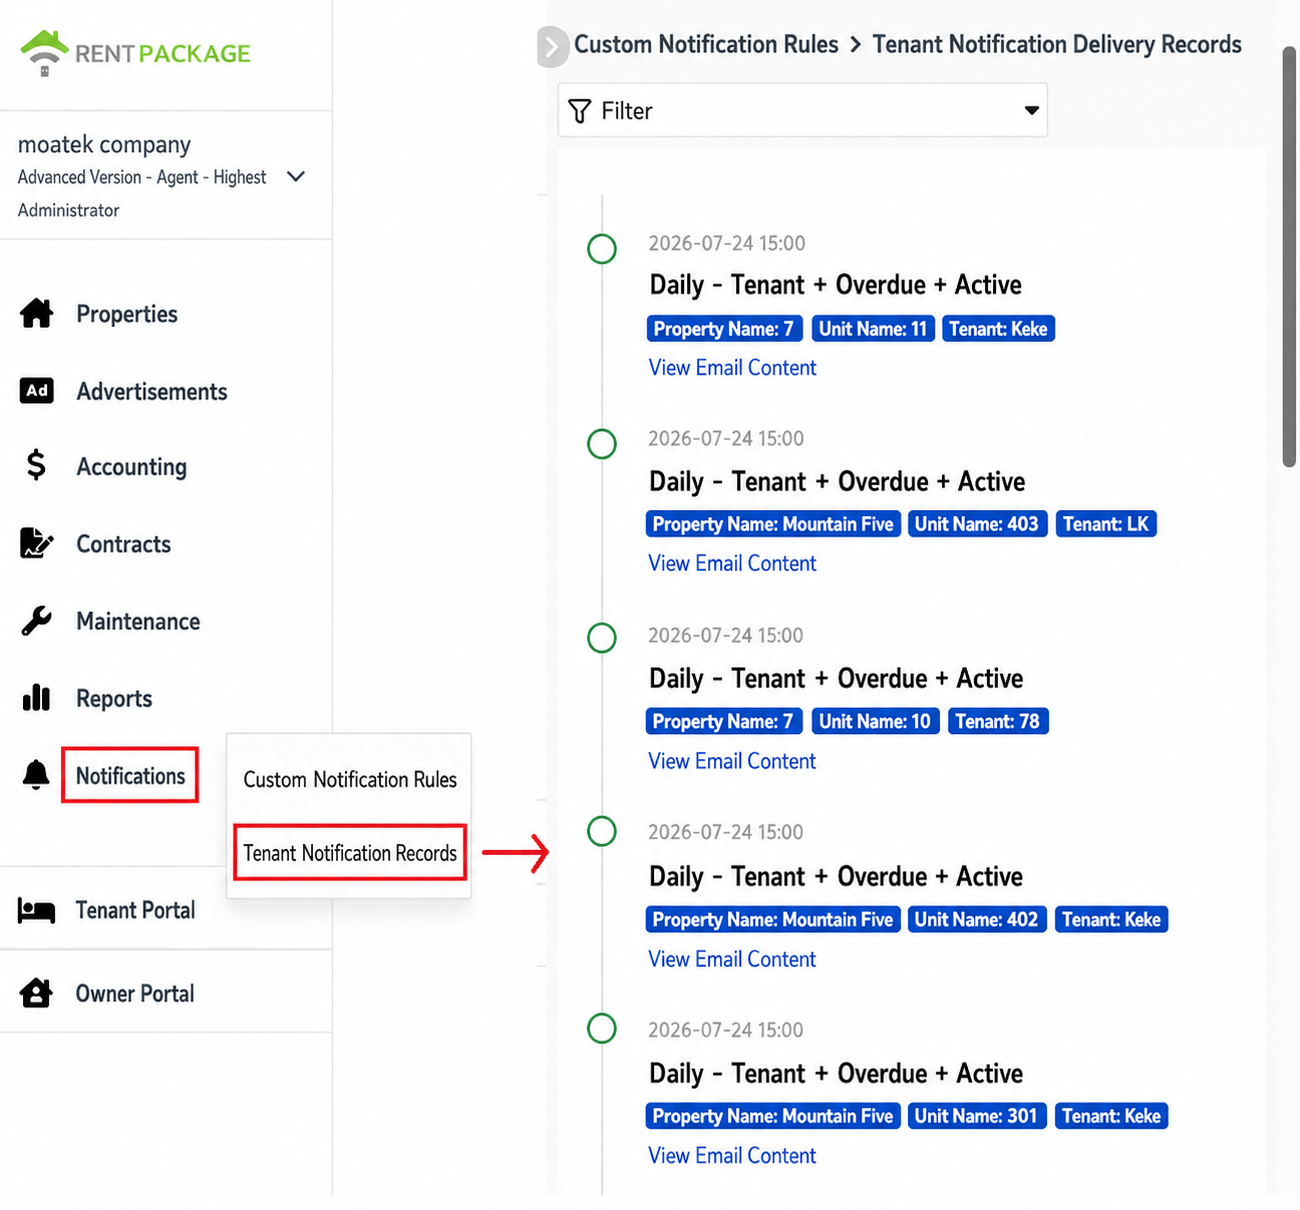
After sending notifications, you can always check their delivery status. Go to the left menu and click '[ Notifications ]' → '[ Tenant Notifications History ]'.
The page lists each sent notification by time, including send time, summary of triggered rules (frequency, target, conditions, and rule status), and the related property name, unit name, and tenant. Click '[ View Letter Content ]' to expand the full text of the letter as received by the tenant.
When there are many records, use the [ Filter ] above to narrow down and quickly find delivery records for specific properties or tenants.
What do sent emails look like? Each person receives their own version.
When a rule is triggered, the system checks each contract: If dates and filter conditions match, it replaces all variables with the contract data and sends it to the corresponding recipient. Thus, the recipient determines the email content.
For example, a rule for a '5-Year Tenancy Appreciation Notice': Tenant Billy receives 'Hi, Billy, thank you for renting Sunny Heights Apartment - Room 301 for five years'; another tenant receives an email with their own name, property, and room. One rule, one personalized email per tenant, and you only set it up once.
FAQ
What is the difference between built-in rules and custom rules?
There is no essential difference. Built-in rules are pre-configured by the system for common scenarios (renewal reminders, move-out notices, insurance expiry, rent adjustment reminders), ready to enable or modify as needed; custom rules allow you to assemble trigger conditions, recipients, and content from scratch, with the same level of flexibility.
What's the difference between event-driven and fixed-cycle?
Event-driven schedules are based on individual contract dates, such as 60 days before each lease's expiration. This varies with each contract and is commonly used for lease notices. Fixed-cycle is sent regularly without tying to contract dates.
What are the double curly brace variables in the content?
These are data placeholders replaced at sending time. The system uses each recipient’s contract data: the tenant's name becomes the recipient's name, and the property and date are set according to the contract's data. Each email sent under the same rule is personalized for the recipient.
When employees are selected as notification targets, will it be sent to all employees?
No, it will only be sent to employees linked to the specific property. Notifications are sent to those responsible for the property, minimizing unnecessary interruptions. Property team members can be adjusted in property settings.
Can rules be modified after setup? What if I don't want to send them temporarily?
Yes, you can. Go to the rules list and use the more options menu for each rule to edit or delete them. To pause sending, set the status to inactive. The configuration will be saved for reactivation later.
The tenant says they didn't receive the notification. How can I verify?
Please check "Notifications" → "Tenant Notification Records". The records will show the delivery time for each notification sent to the tenant. Click "View Email Content" to see the full message sent. If delivery is confirmed in the records, ask the tenant to check their spam folder or verify their email in the tenant information.