📄 Interface Environment Overview: Understand the main screen in five minutes, knowing where to handle everything. 📄 How to Use the Property Overview in RentPackage to Quickly Grasp the Status of the Entire Building 📄 Add Managed Property: Complete property setup, owner details, account opening, and online signing in one go. 📄 Tenant Move-in & Lease Signing: Set rental period, deposit, utilities, and billing cycle in one go. 📄 Tenant Ledger Actions: Payment Reconciliation, Partial Payments, Meter Reading, and Deposits. All routine rent collection in one place. 📄 Owner transfer feature guide 📄 Custom rental notifications: rent reminders, lease expiration, sent to the right person at the right time 📄 How to Quickly Estimate Next Month and Year’s Rental Income with Forecast Receipts in RentPackage 📄 Compliance assistance and responsibility statement 📄 Contract templates overview 📄 Sublandlord feature guide 📄 Partial payment feature guide 📄 Advance Receipts feature guide 📄 Rent billing periods feature guide 📄 Start billing feature guide 📄 Recurring billing periods feature guide 📄 Booking feature overview 📄 E-contract setup guide 📄 Management fee setup guide for property management companies 📄 Why are deposits and advance receipts liability accounts in accounting? 📄 RentPackage General Edition overview 📄 Commission split setup guide 📄 why do all landlords and agents need tenant management automation software? 📄 How to handle exchange rates for Euro-denominated rent? 📄 US Tax Filing - Schedule E Instructions 📄 UK Tax Filing - SA105 Instructions 📄 How to Enable Stripe Online Rent Payments in RentPackage 📄 How to use Calendar to schedule tenant notifications: Power outage example 📄 How to set the agency logo to display your brand on Email notifications and contract PDFs 📄 What is Rent Insurance? Compensation for unpaid rent; policy managed with the lease 📄 How to Use the German Rental Income Tax Statement (Anlage V) in RentPackage 📄 T776 Canada Rental Income Tax Report User Guide 📄 PIT-28 Polish Rental Income Tax Report User Guide 📄 How to Generate an Australian Rental Schedule in RentPackage, Auto-Match Income and Expenses to ATO Categories 📄 How to Use the Romanian Rental Income Tax Report (Declarația Unică 212) in RentPackage 📄 How to generate Hungarian SZJA rental income report data in RentPackage and compile eSZJA entry numbers with one click. 📄 Profit and Loss Statement: Auto-calculates income per property, per owner 📄 Balance Sheet: How much of the bank balance is tenant's? View deposits and prepayments at a glance. 📄 Cash Flow Statement: How much did actual cash increase during the rent period? 📄 How to generate a General Ledger in RentPackage, automatically summarizing rent and property accounts 📄 Enter manual journal entries: repairs, insurance, depreciation. Record transactions outside of the billing period. 📄 Custom rental notifications: rent reminders, lease expiration, sent to the right person at the right time 📄 Why can property management software dramatically save time and cost?

What is Rent Insurance? Compensation for unpaid rent; policy managed with the lease

Quick Links

What is Rent Insurance?

Rent insurance is designed to address potential rent delays, missed payments, or tenant defaults during a lease. It provides compensation within agreed limits when tenants fail to pay, helping landlords reduce risk and ensuring more secure property management.

Countries with representative rent insurance systems include:

Country Common Product Name Insurance Highlights
Spain Seguro de impago de alquiler Primarily covers rent loss due to tenant non-payment, often includes legal assistance or litigation support for landlords, with some plans covering property damage or vandalism.
France GLI (Garantie des loyers impayés) Compensates landlords when tenants do not pay rent on time or accrue related fees; some plans include property damage or legal processing costs.
United Kingdom Rent Guarantee Insurance Provides monthly compensation to landlords for rent income when tenants default.
Australia Landlord Insurance Typically includes coverage for rental loss, tenant default, and some leasing risks.

Why manage rental insurance in the system?

Tenant late payments, arrears, or breaches directly impact cash flow, requiring time and cost for recovery. Rental insurance compensates for such losses, but if policy data is scattered across paper, emails, and various folders, with multiple leases, verifying coverage or checking policy expiry becomes tedious. Missed renewals go unnoticed.

The system attaches policy data directly to leases: waiting periods, policy dates, coverage amounts, and attachments are stored together with leases. Documents are archived during signing, and future viewing, editing, or renewal is done on the same screen. Rental income is backed by insurance, and coverage status is easily checked without relying on manual records.

How to use the rental insurance feature in the system?

Step 1: Access the Insurance Company Info section
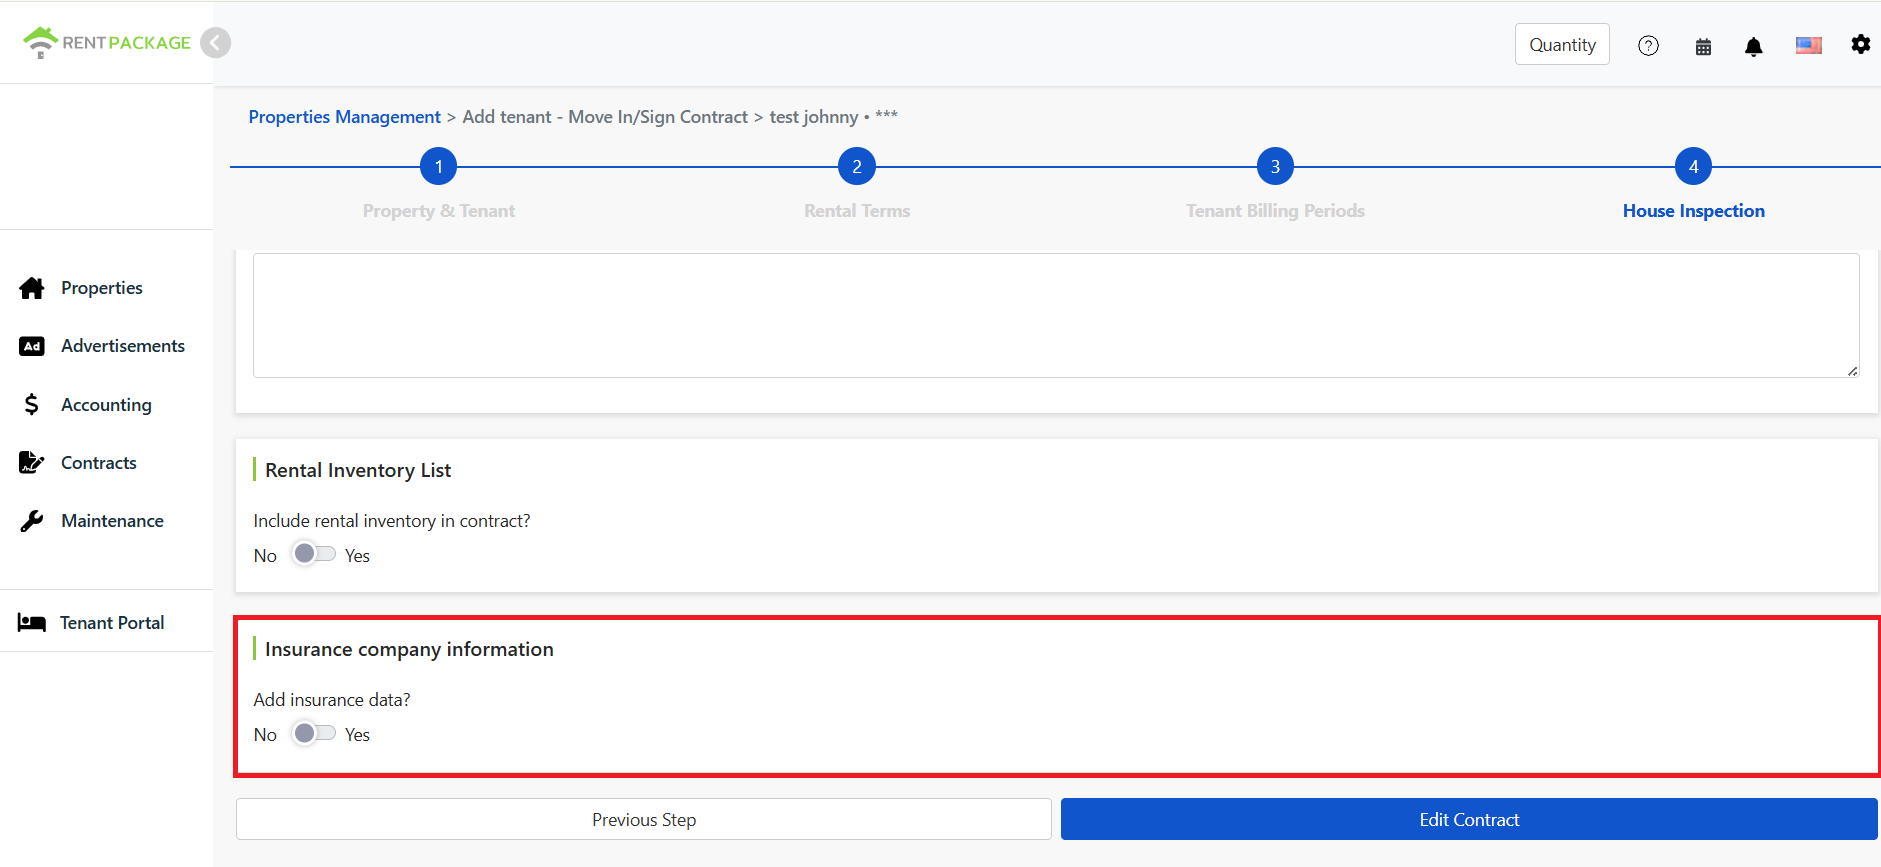
Insurance company info and toggle on the Inspection page

During the move-in/signing process, after reaching Step 4 on the property inspection page, scroll down to the Insurance Company Info section. It is closed by default; to open, toggle the switch from No to Yes.

Step 2: Fill in insurance details
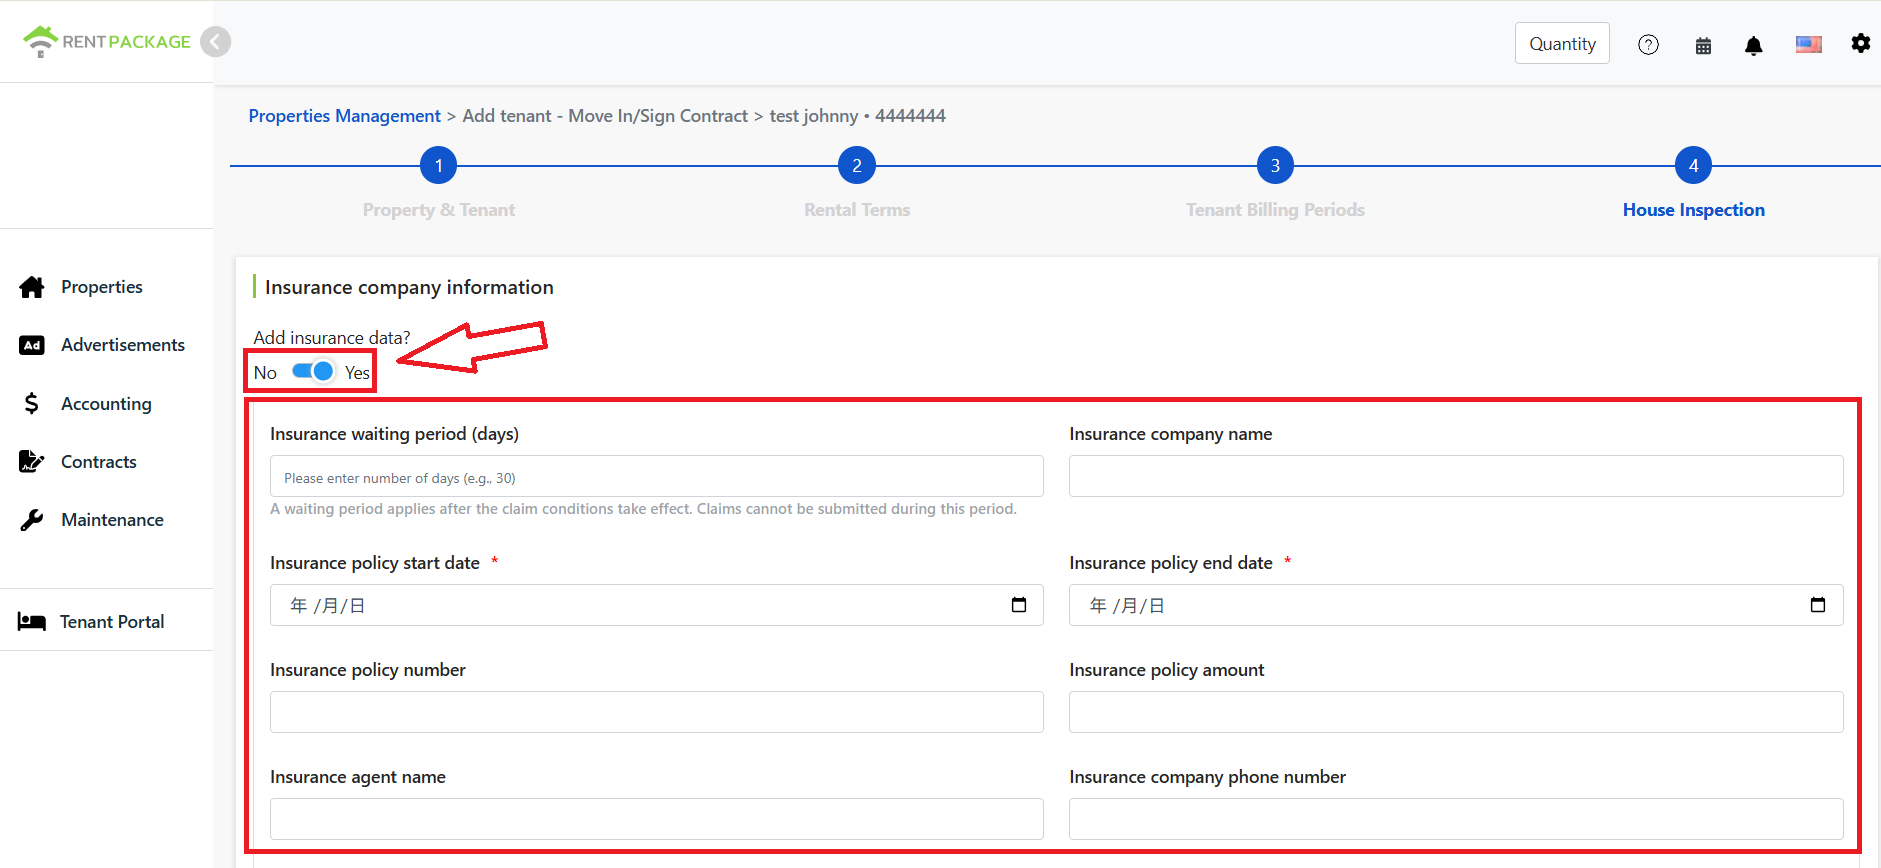
Insurance details fields: Waiting period, Company name, Policy start/end date, Policy number, Policy amount

After opening, fill in the insurance details in order, including:

  • Insurance Waiting Period (Days): The number of days required to wait before the insurance claim process starts after a tenant's late payment or arrears. During the waiting period, landlords cannot file for claims; claims can be made per policy terms only after this period ends and if the tenant still hasn't paid.
    For example, if rent is due by 3/1 and a tenant misses payment, with a 30-day insurance waiting period, you must wait until the period ends and if the tenant still hasn't paid, you can file a claim.
  • Insurance Company Name: Enter the name of the underwriting insurance company.
  • Policy Start Date: Set the policy effective date.
  • Policy End Date: Set the policy expiration date.
  • Policy Number: Enter the policy number for reference and management.
  • Policy Amount: This is the coverage amount or limit, indicating the compensation range the insurer can provide. Actual coverage depends on policy terms.
  • Agent Name: Enter agent or contact person's name.
  • Insurance Company Phone: Enter the insurance company or contact phone number.
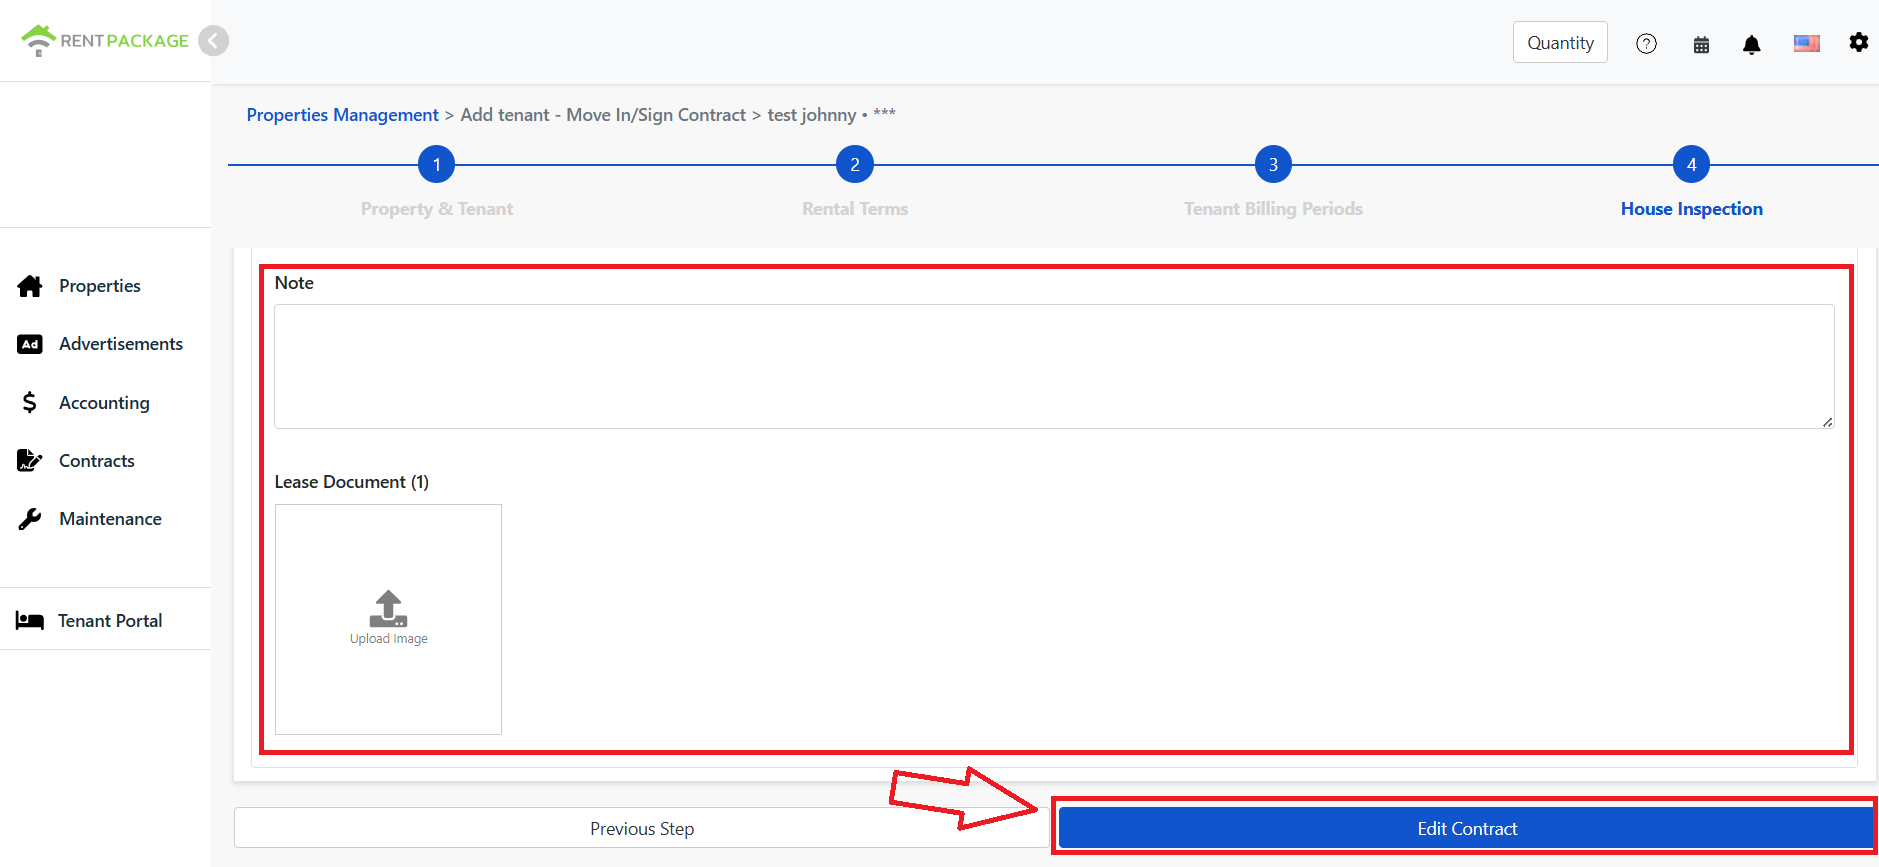
Insurance details fields: Agent, Phone, Notes
  • Notes: Provide additional information here, like special claim conditions, policy addenda, or internal management notes.
  • Contract Document Upload: Upload related PDF contracts or images here to attach to the insurance records.
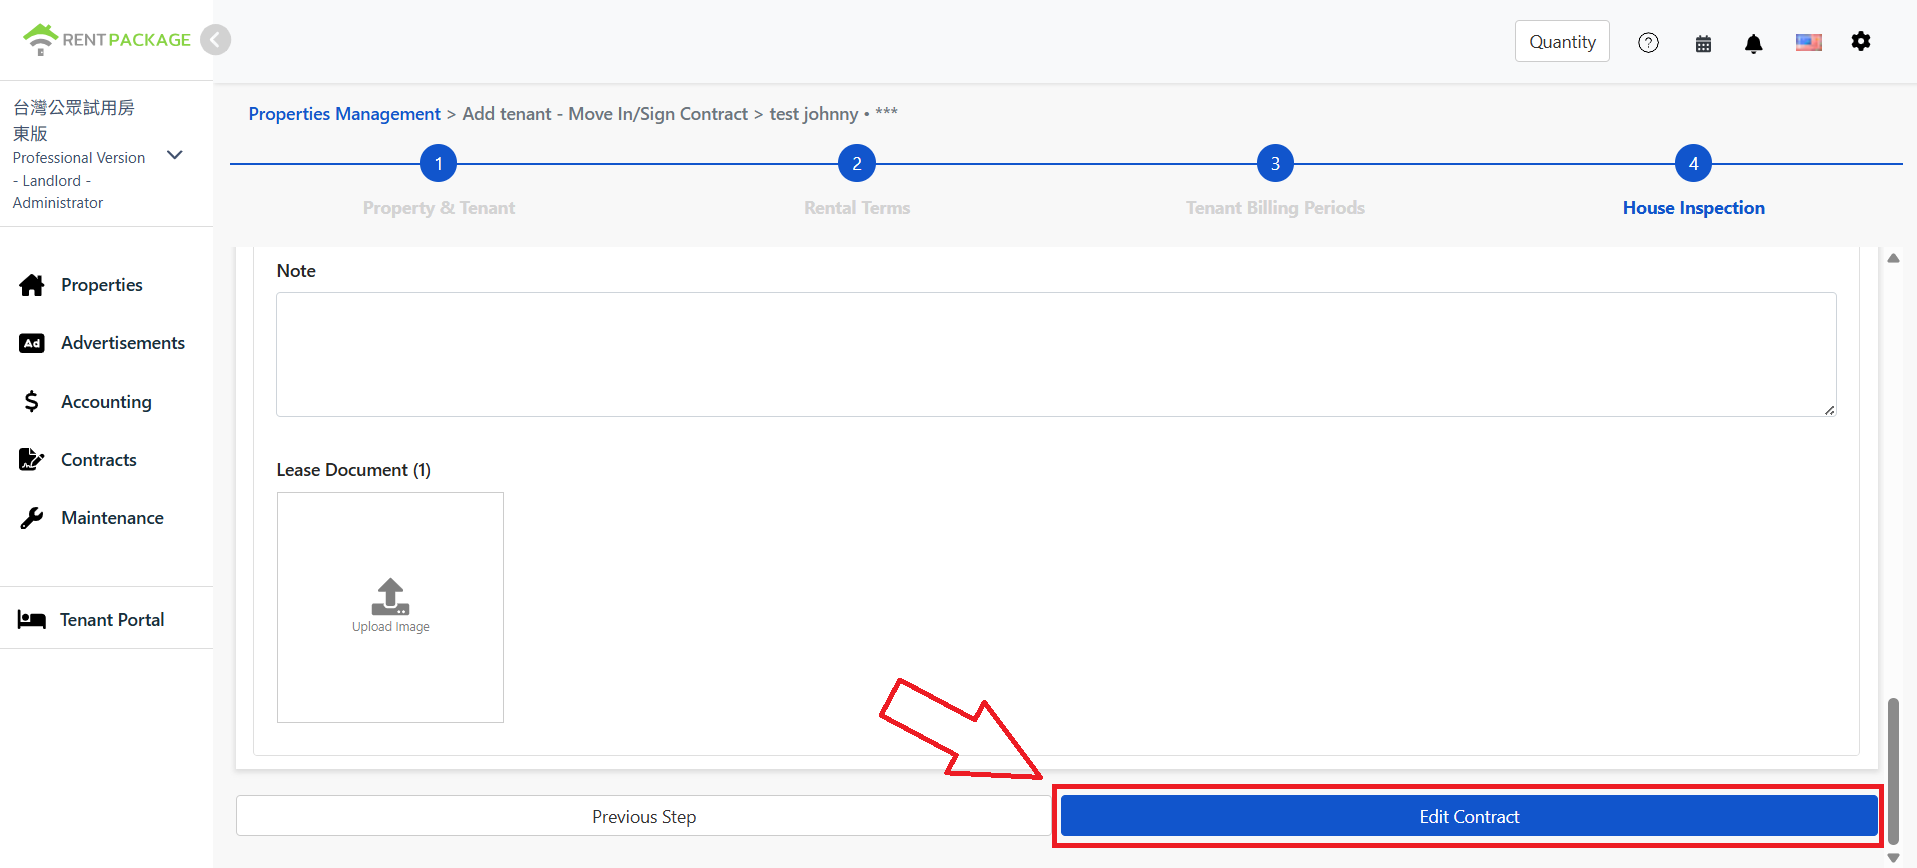
Notes and contract file upload section, click 'Save Contract' when done

After completing all insurance data and property condition entries, click the 'Modify Contract' button at the bottom of the page to save your settings. Once saved, the rent insurance information for the lease will be available for future reference, management, and tracking.

How to view, modify, add, or delete rent insurance post-signing?

Step 1: Locate the Rent Insurance Function for the Lease
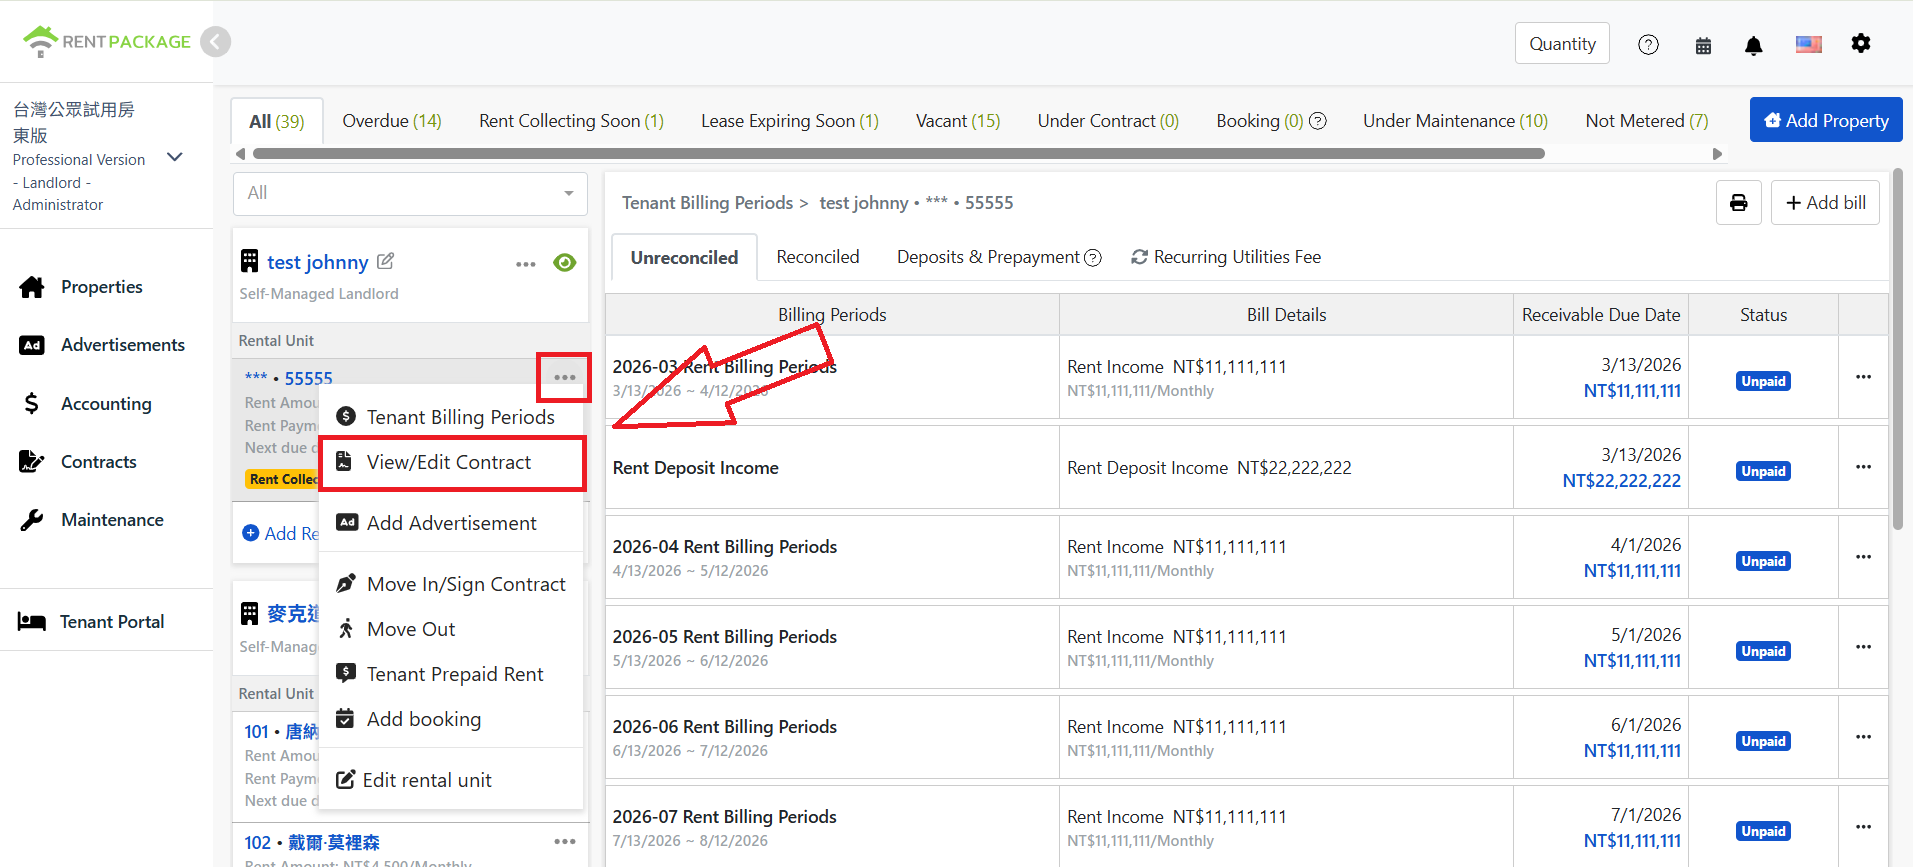
Access view/edit contract in the property listing's more menu

Go to the property management page, find the room you want to view in the property/room unit list on the left, click the more menu (three-dot icon), and select 'View/Modify Contract' from the dropdown.

Step 2: Confirm the Current Insurance Data Status

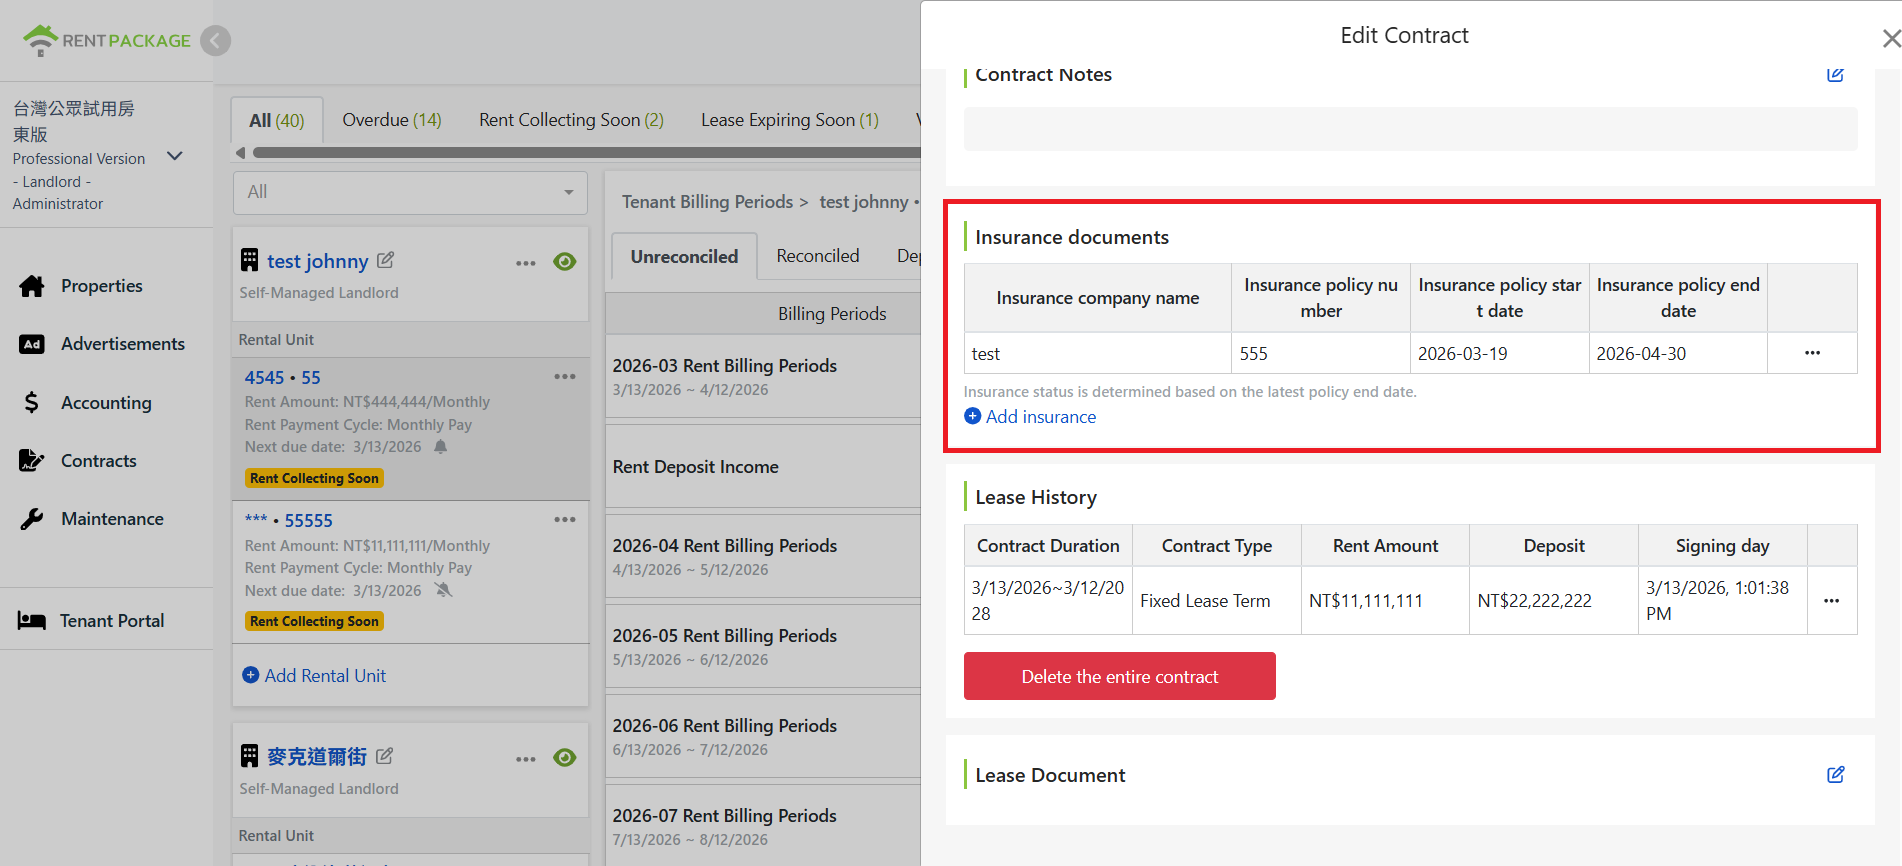
After accessing the contract view/edit page, scroll down to the Insurance Documents section. The available actions depend on whether insurance data is present.

Please Note: A lease can have multiple policies. When multiple policies exist, the system determines the insurance status by the latest policy end date. To renew, just add a new policy; the status updates automatically. Old data is retained without deletion.
Scenario 1: Existing insurance data
Insurance documents section on the Edit Contract page displays existing insurance details

The Insurance Documents section displays existing insurance data. In this case, users can view, edit (Step 3), delete (Step 4), or add (Step 5) insurance data.

Scenario 2: No existing insurance data

No insurance data is displayed in the Insurance Documents section, indicating no insurance information has been created for this lease. Users can only add insurance data (Step 5) in this scenario.

Step 3: View/Edit Rent Insurance

This feature is applicable only when insurance data already exists.
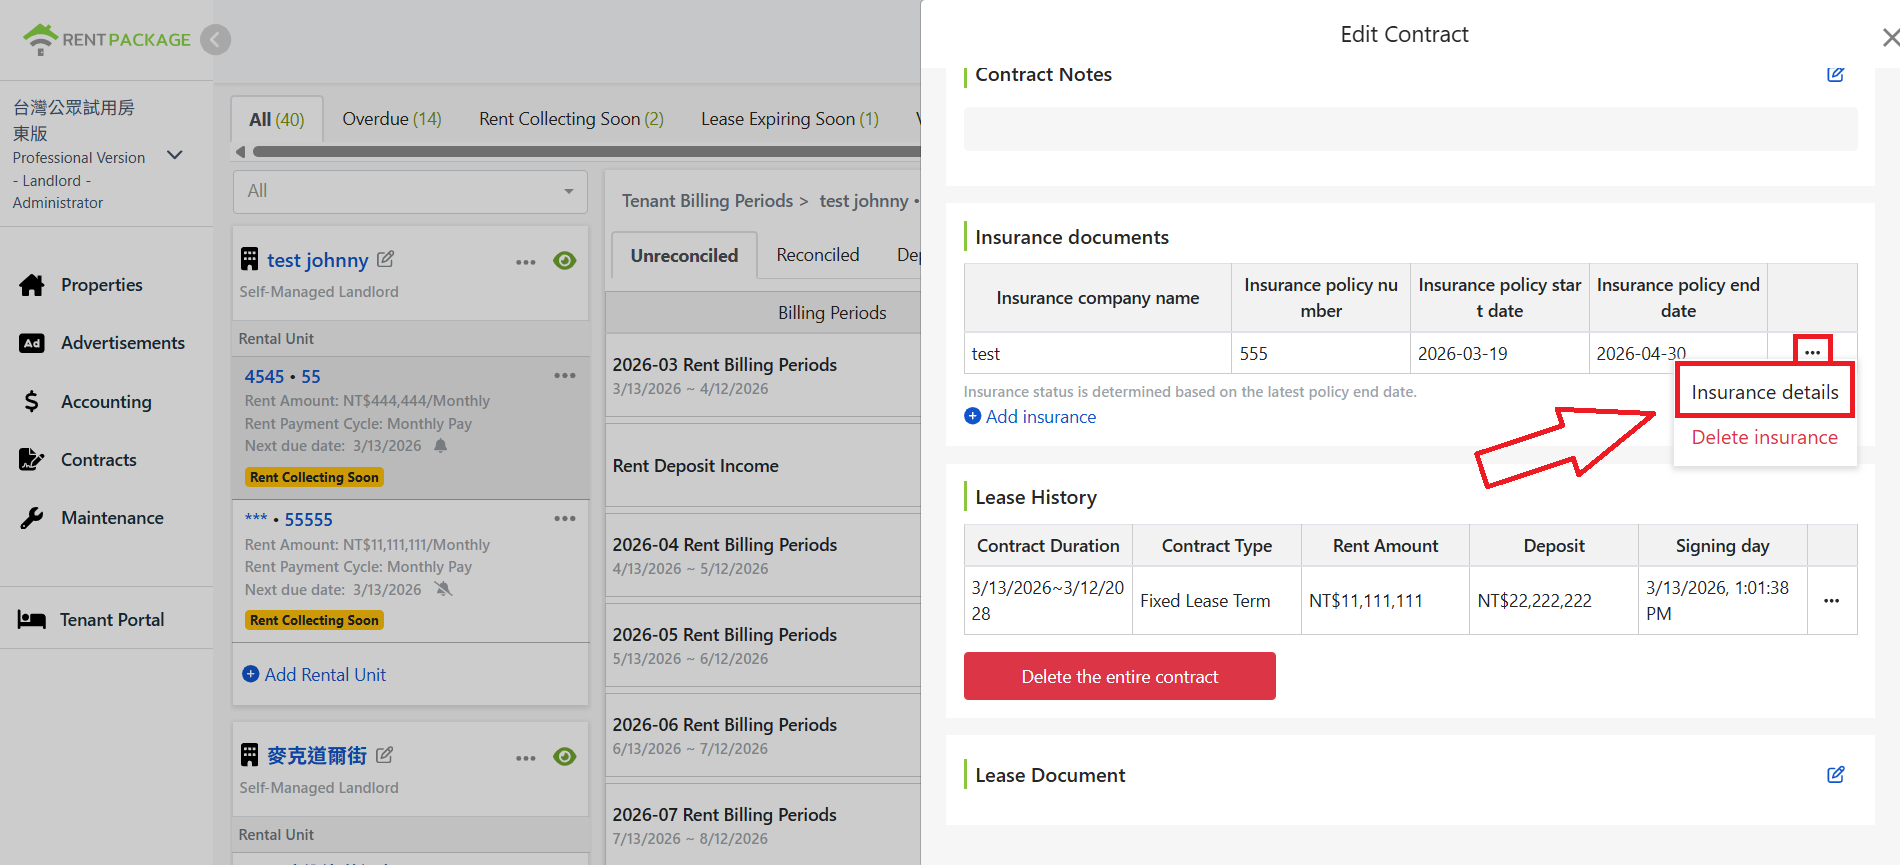
Click 'Insurance Details' in the menu next to insurance information

In the Insurance Documents section, locate the insurance data to view or edit. Click the action menu (three dots icon) next to it, then select Insurance Details to open the detailed view.
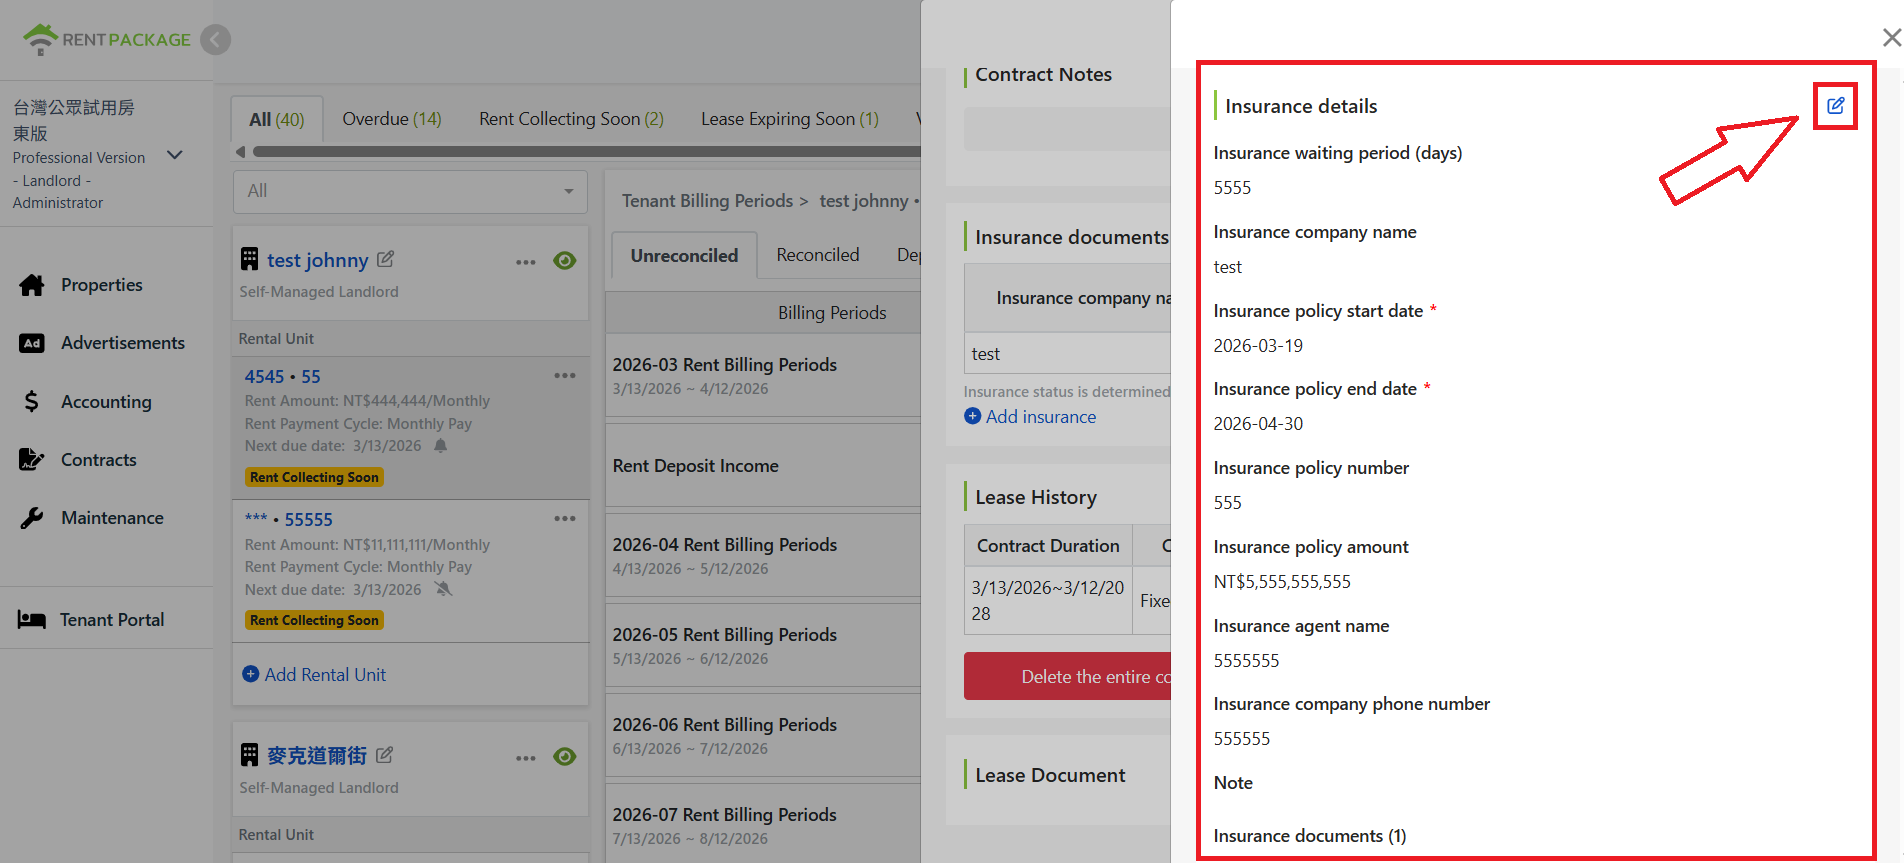
Insurance details window and top-right edit icon

On this screen, users can view all established insurance information. To adjust existing insurance data, click the edit icon at the top right.
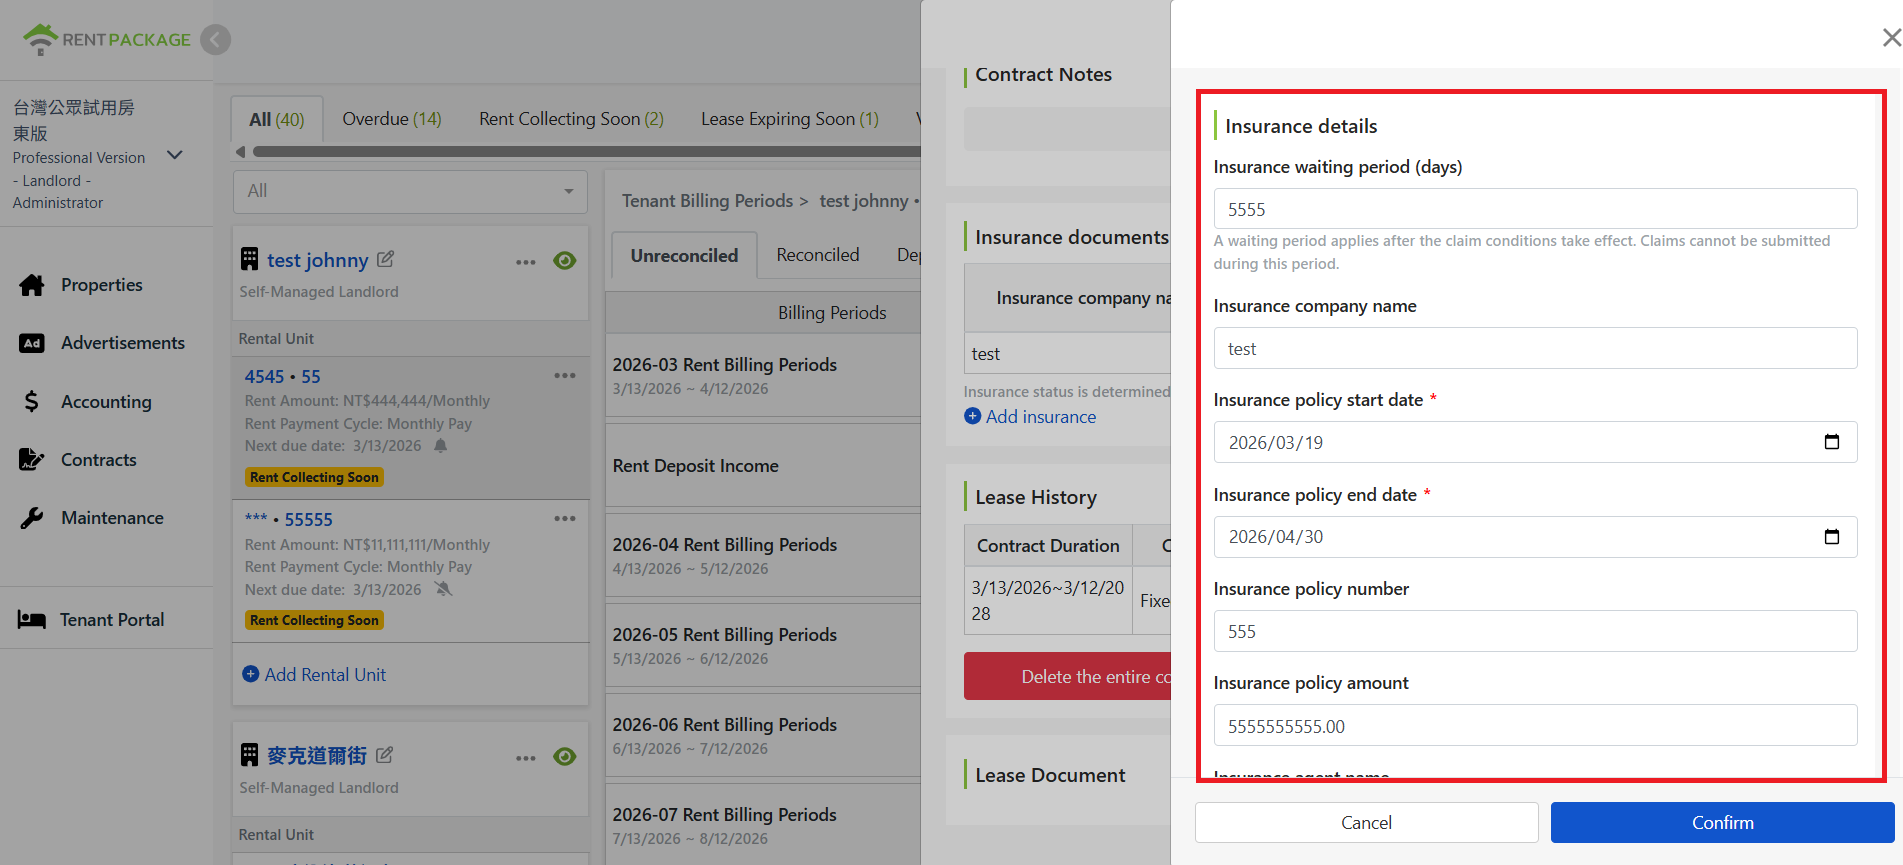
All insurance details can be edited in edit mode

After clicking, the system enters edit mode, allowing users to modify insurance data.
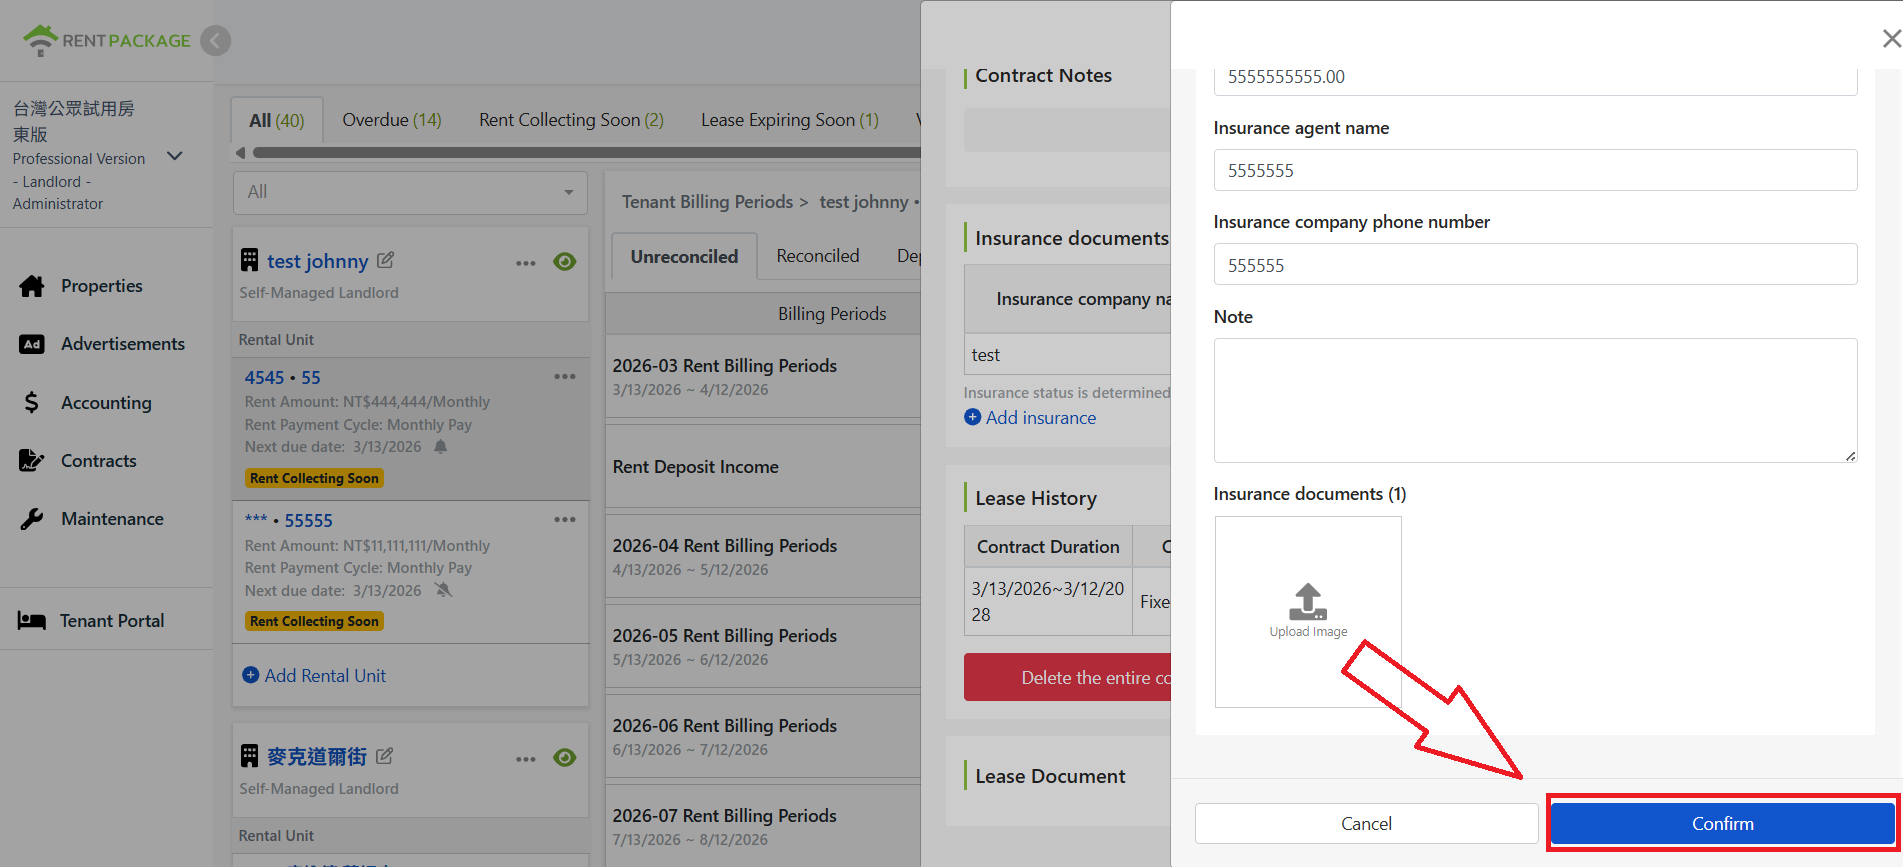
Click confirm to save after editing

After making changes, scroll to the bottom and click Confirm to save or Cancel to discard changes.

Step 4: Delete Rent Insurance

This feature is applicable only when insurance data already exists.
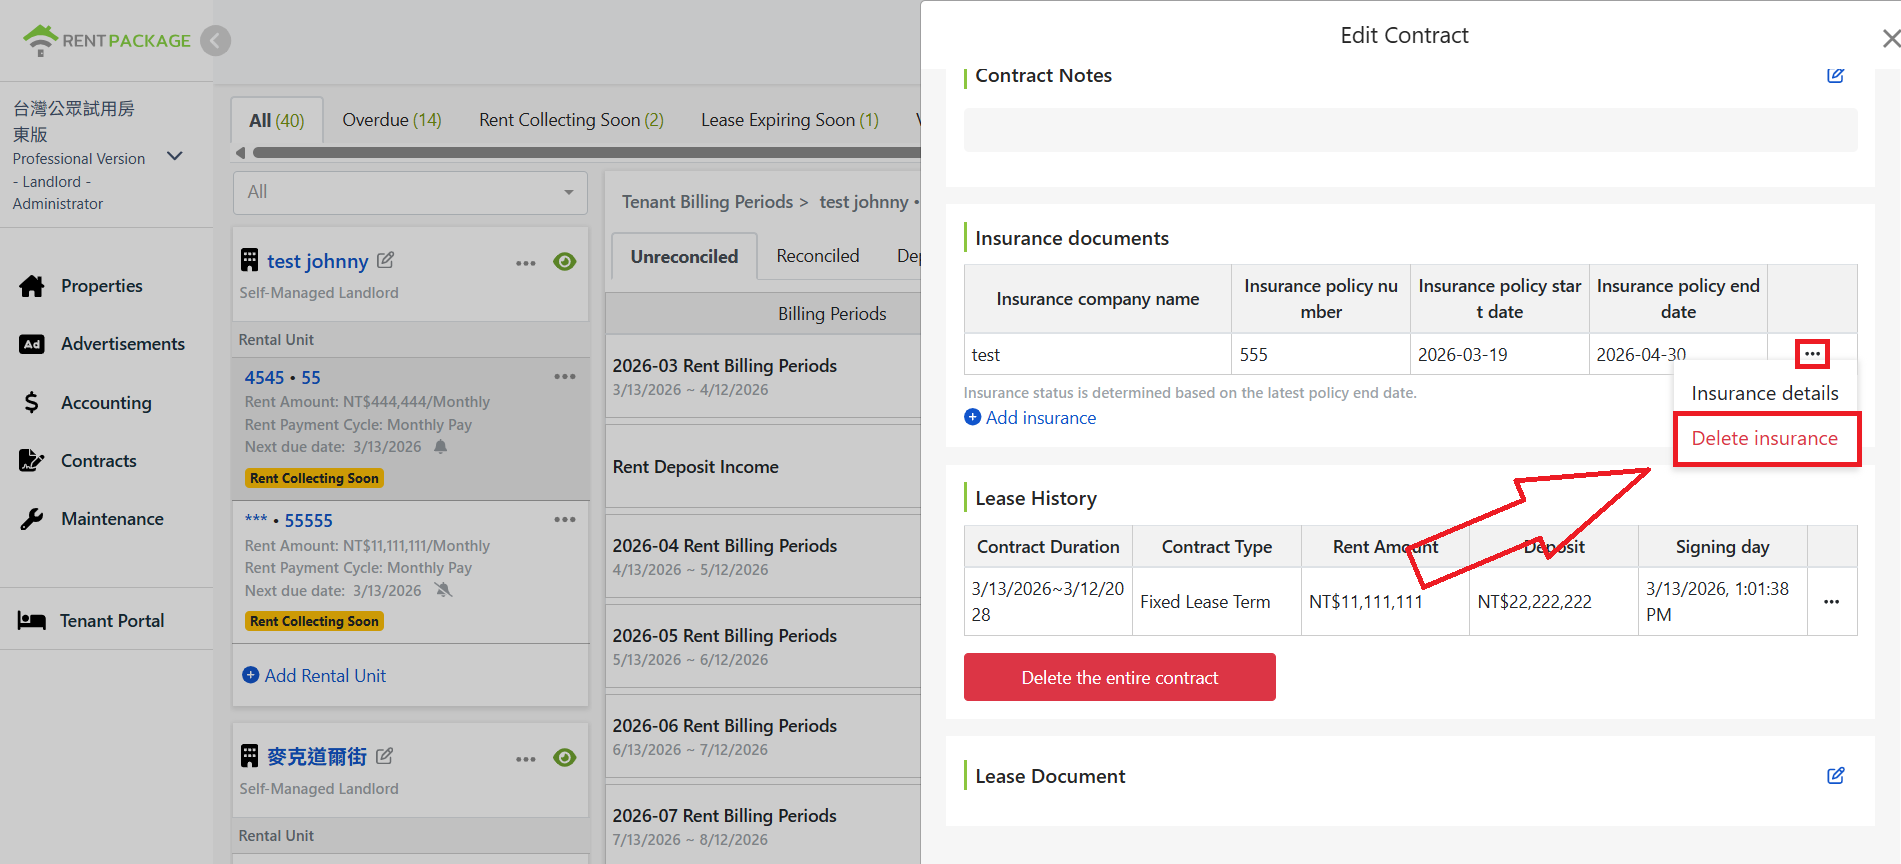
Click 'Delete Insurance' in the menu next to insurance information

When the insurance info is no longer needed, locate it in the insurance documents section. Click the action menu (three dots) next to the entry, then select Delete Insurance.
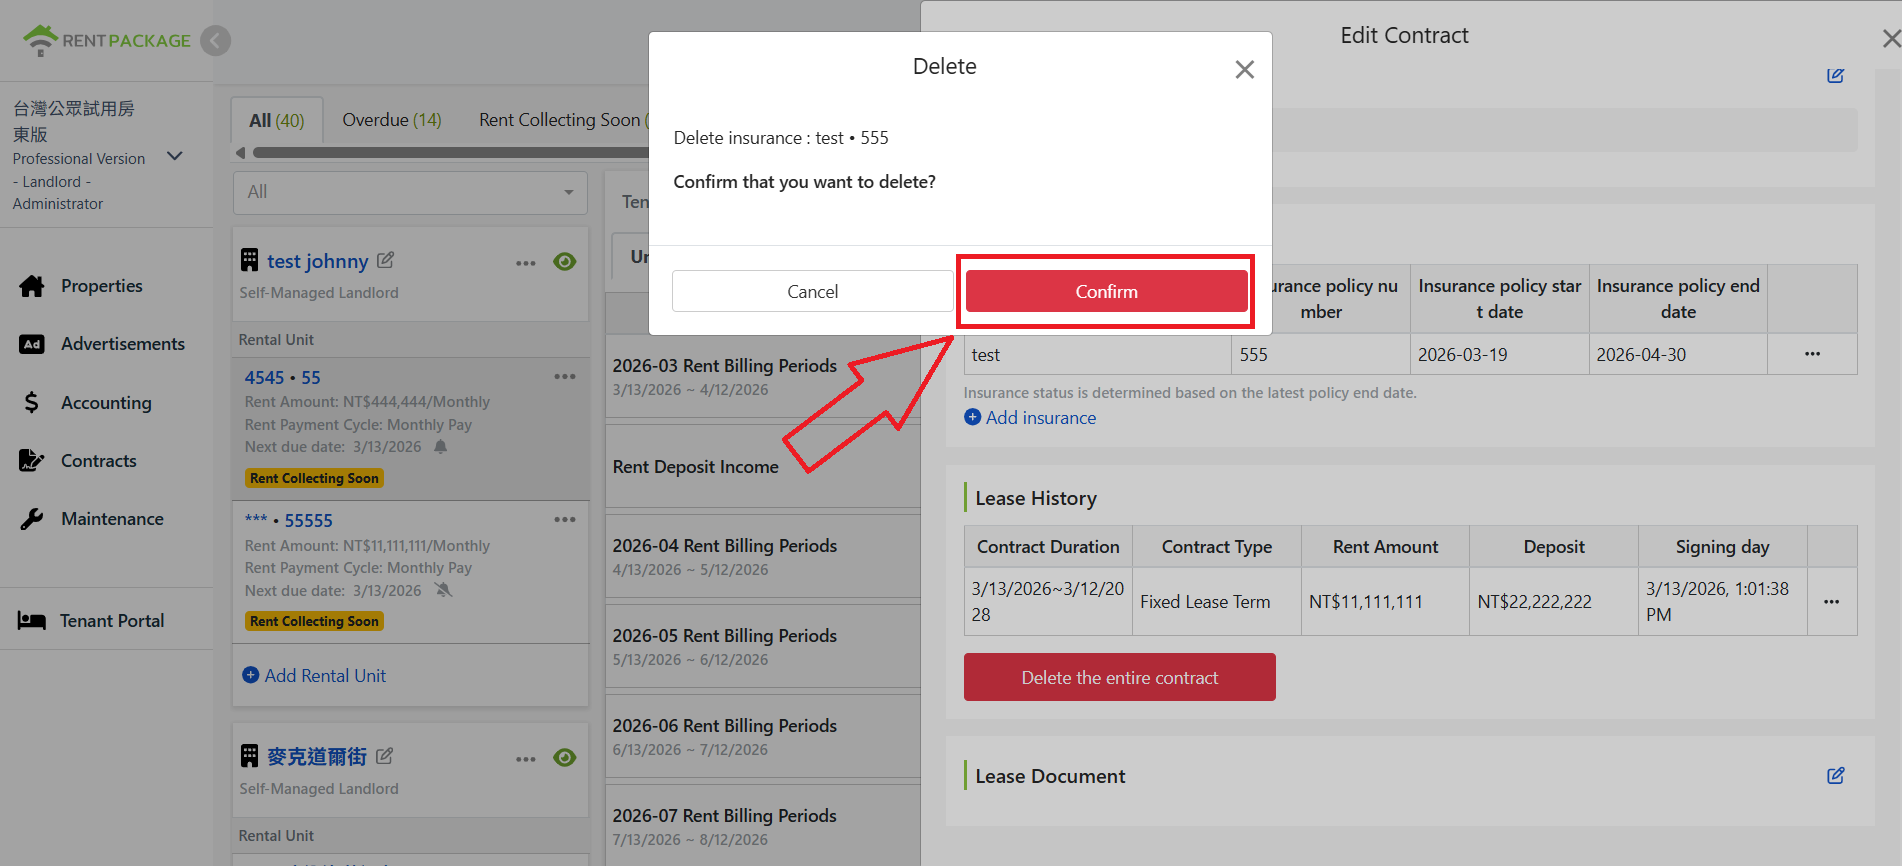
Delete confirmation window, click confirm to complete deletion

A confirmation window will appear showing the insurance name to be deleted. Click Confirm to complete the deletion.

Step 5: Add Rent Insurance
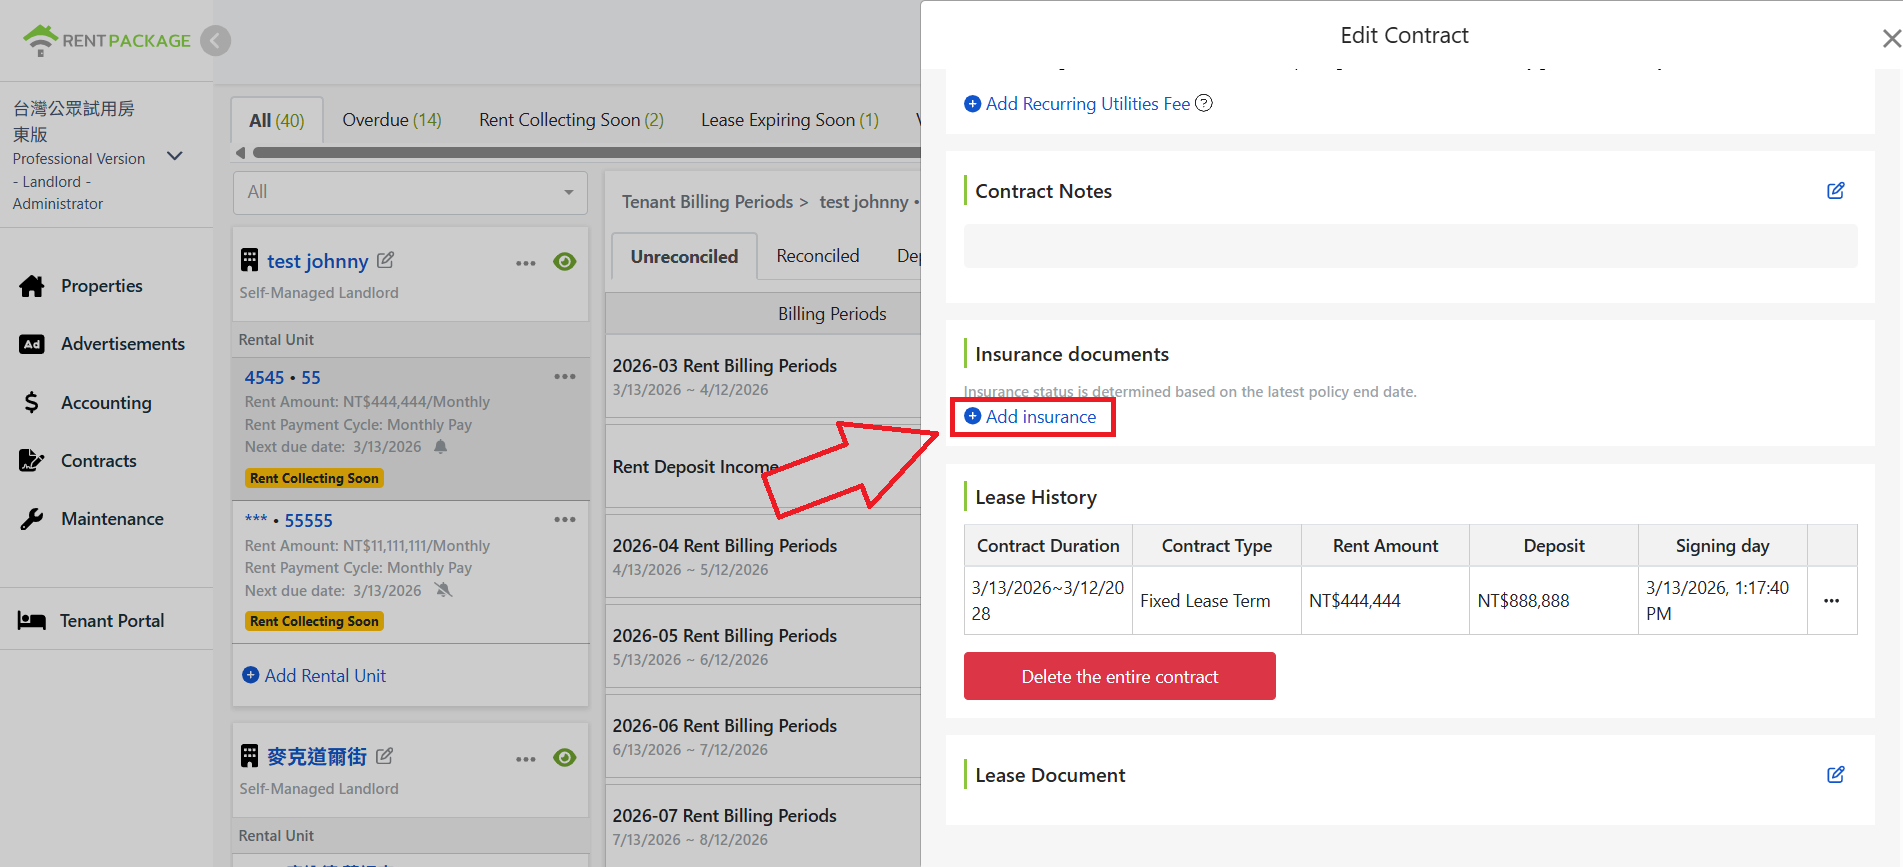
Add Insurance button in the Insurance Documents section

To add new rent insurance when there is none, or in addition to existing entries, click the + Add Insurance button in the insurance documents section.
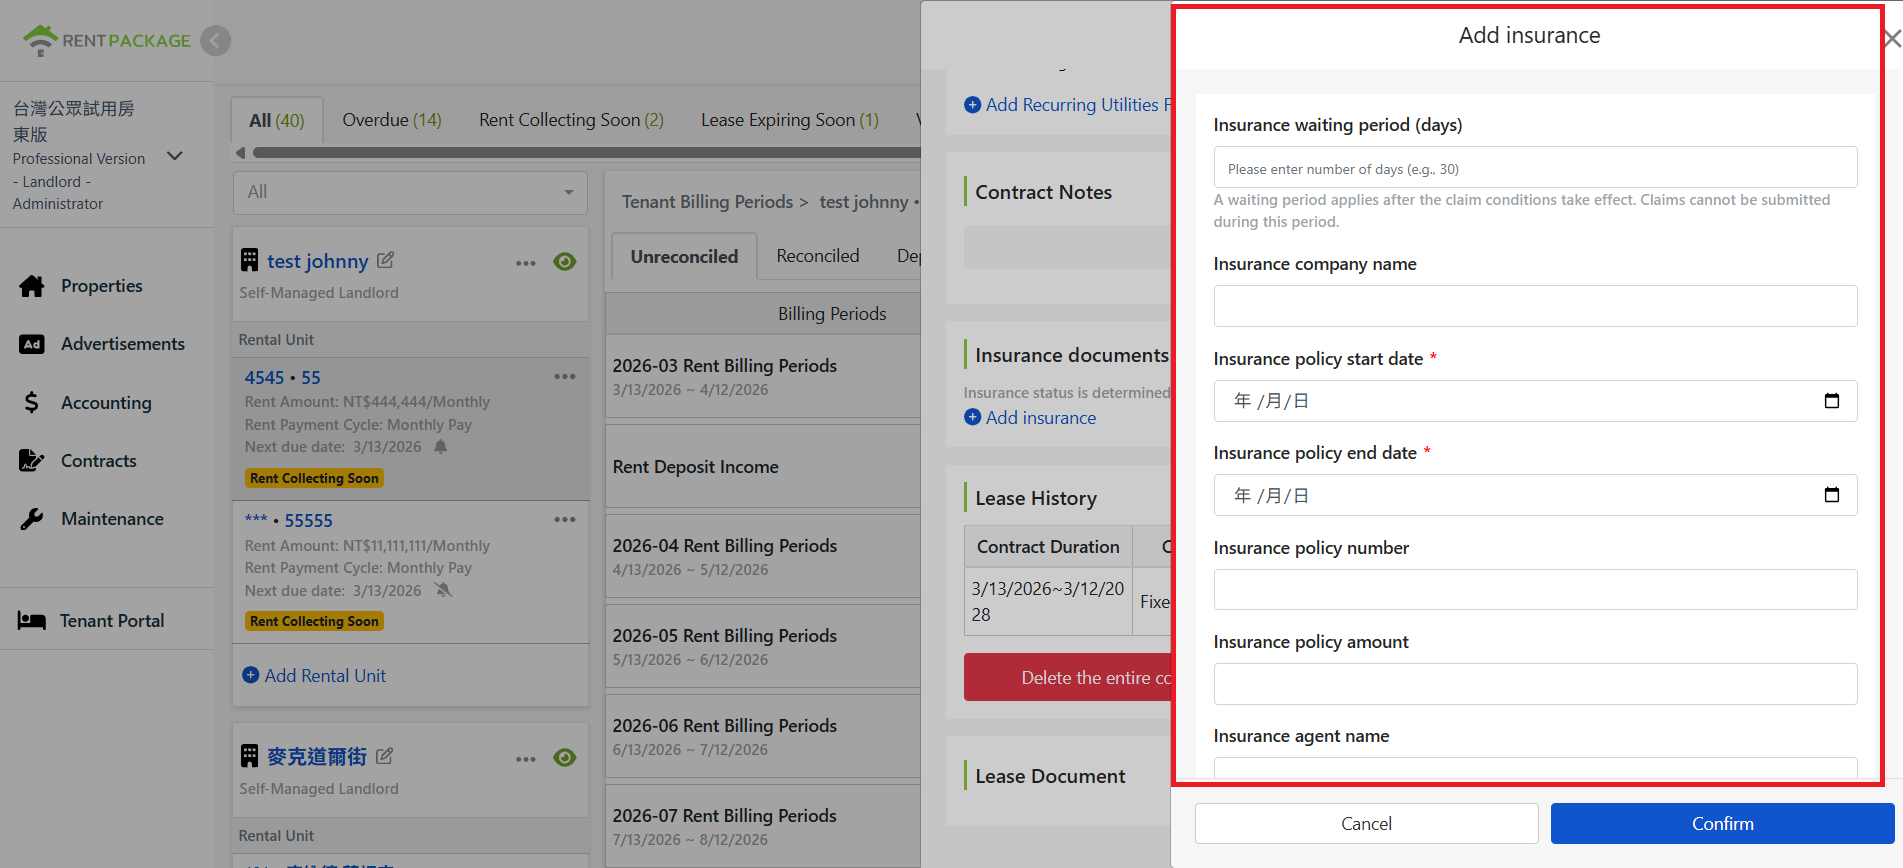
Add Insurance window and fields

Clicking it opens the Add Insurance window where you can enter insurance details.
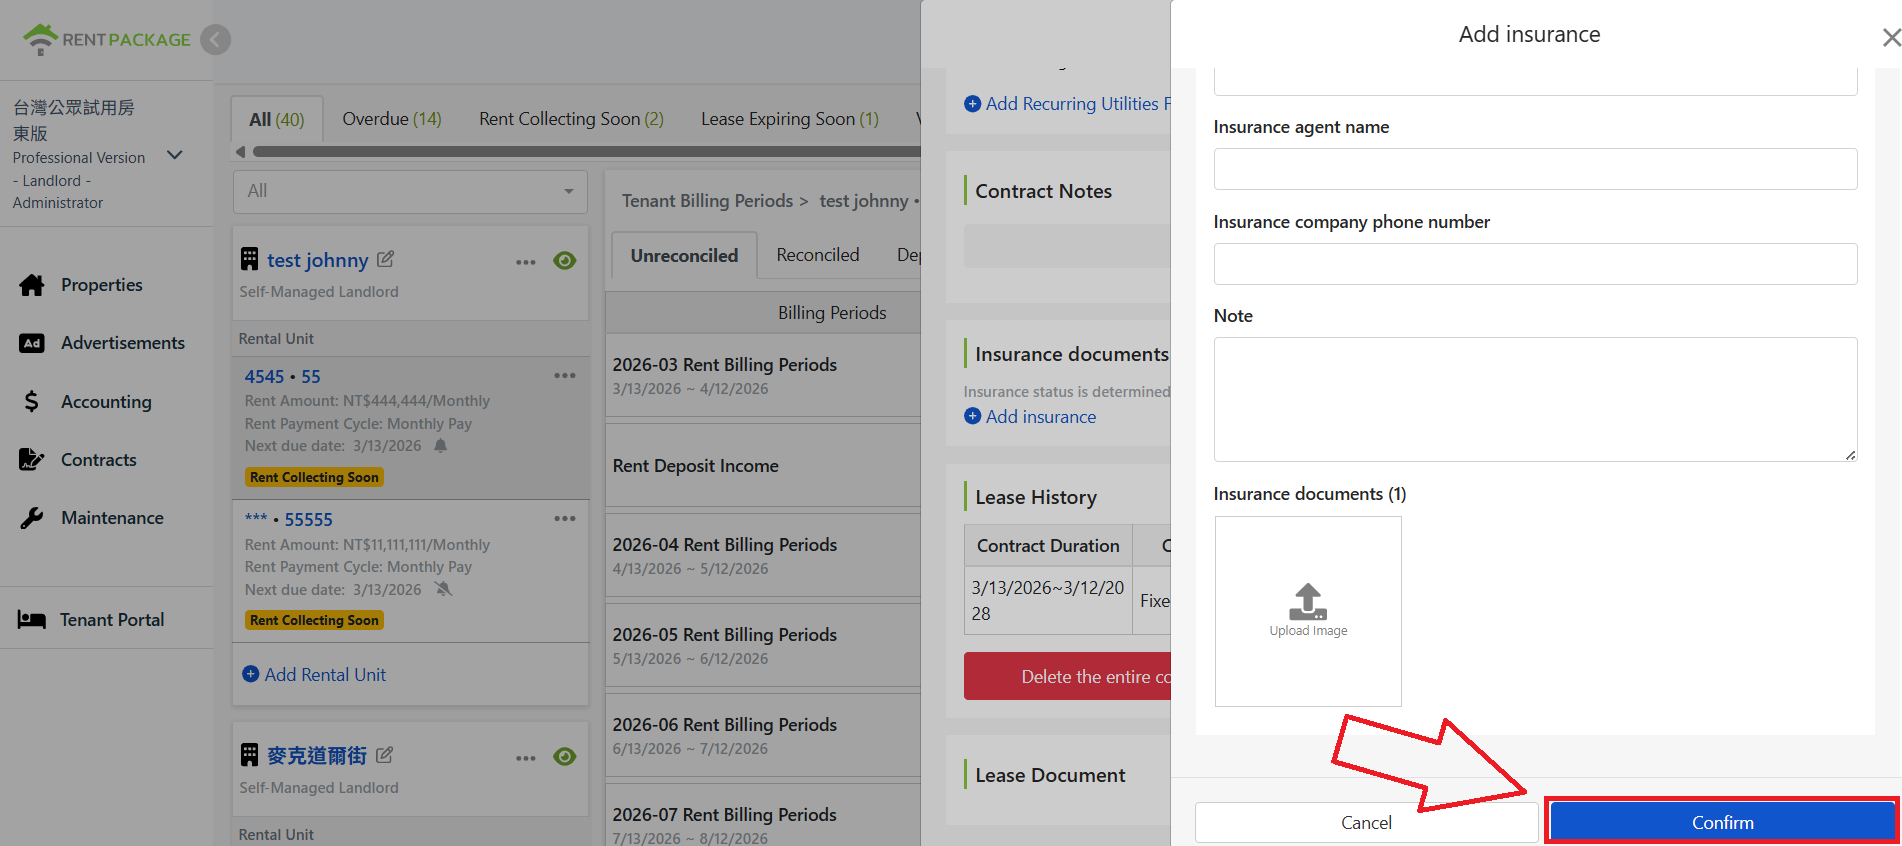
Click confirm to create insurance record after filling in

After completing the details, scroll down and click Confirm to create the insurance entry.

Key Points on Rent Insurance

  • Policy details are linked directly to the lease: waiting period, policy dates, coverage amount, contact person, and attachments are all in one view, no need to search through paper or emails.
  • A lease can have multiple policies. Insurance status is determined by the latest policy end date. For renewal, just add a new policy and the status updates automatically.
  • Policies can be recorded upon signing and viewed, edited, added, or deleted anytime afterward, without leaving the lease page.
  • Policy PDFs and images can be attached to the lease, providing easy access to original documents for claims or owner inquiries.
✅ Add rent insurance details to the contract process now for secure rent collection!