
Interface Environment Overview: Understand the main screen in five minutes, knowing where to handle everything.
Quick Links
- The six areas of the main screen.
- 1. Status Bar: Today's Tasks at a Glance
- 2. Left Panel: Property & Room List Overview
- 3. Central Workspace: Main Area for Operations
- 4. Left Sidebar: Module Access Points
- 5. Top Right Toolbar: Settings & Extras
- 6. Account & Branch Switching: Seamlessly switch between multiple products or branches.
- 7. Switch Tenant/Owner Portal
- Connecting six key areas: A typical workflow example.
- FAQ
The six areas of the main screen.
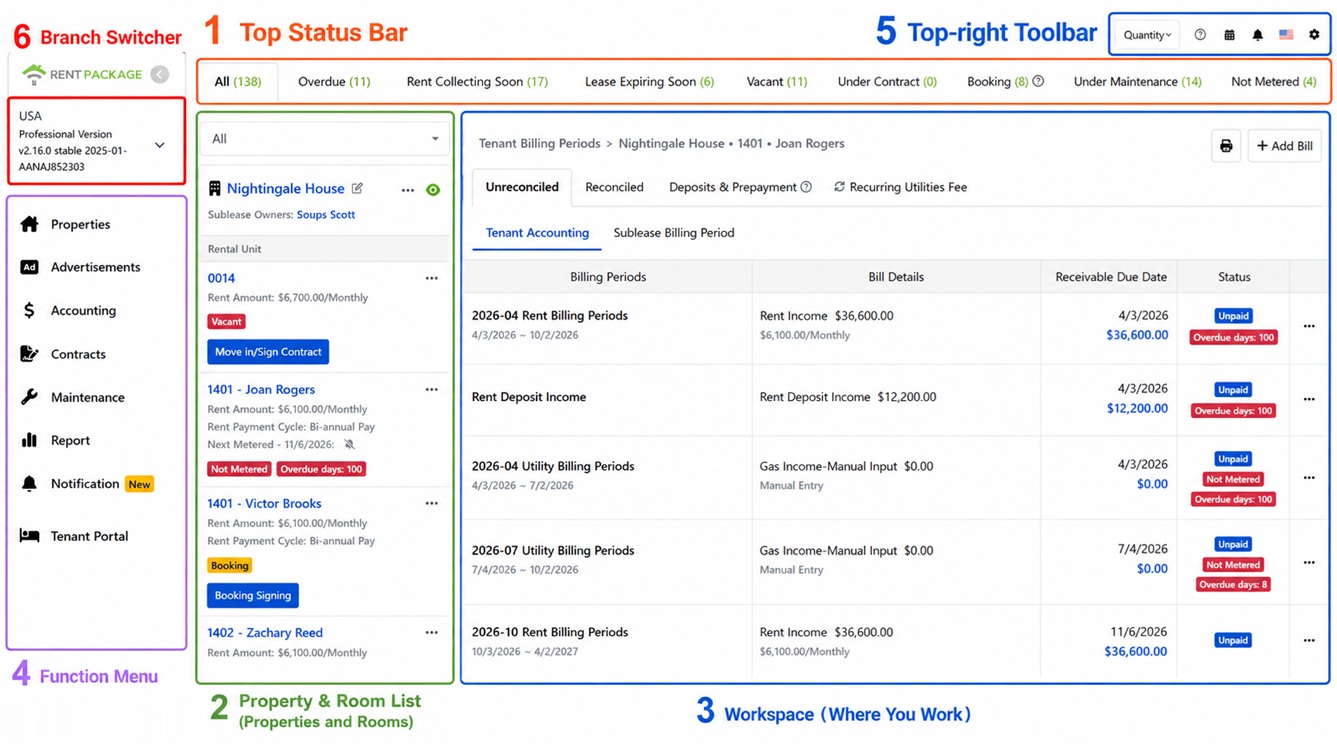
The main screen upon login is divided into six areas, corresponding with the diagram: 1 Status bar at the top, 2 Listings and room list on the left, 3 Workspace in the center, 4 Function menu on the left side, 5 Toolbar at the top right, 6 Account and branch switch at the top left. Remember one rule: the status bar tells you what to do today, the left frame helps find the location, and the workspace is where you execute tasks.
1. Status Bar: Today's Tasks at a Glance
The tabs at the top are your dashboard: All, Overdue, Rent Due Soon, Lease Expiring, Vacant, In Contract, Reserved, Under Repair, Not Metered. Numbers indicate real-time stats. These tabs also filter: click one to show rooms in that status only.
Start each day by checking these numbers: overdue items to collect, leases expiring requiring renewal talks, vacant rooms to list. The system calculates it for you.
2. Left Panel: Property & Room List Overview
The left panel has two levels: property cards (showing property names and owners), with units below. Each room shows rent, billing cycle, next rent date, and status tags (vacant, in contract, overdue days, not metered) at a glance; also move-in/contract buttons if vacant.
Click a room to load its details in the workspace on the right, the most used path. The top dropdown enables further filtering.
3. Central Workspace: Main Area for Operations
The central workspace changes with the selected item: rooms load tenant billing (unreconciled, reconciled, deposits & prepayments, recurring fees, etc.), repair functions show tickets, reports show reports. Each has detailed guides; remember: find in the left panel, act in the workspace.
4. Left Sidebar: Module Access Points
The left sidebar is the gateway to modules: Property Management (daily tasks), Advertising (listings), Finance (reports & manual entries), Contracts (tenant/owner agreements & templates), Maintenance, Reports, Notifications, and portals for tenants/owners. Click a module to switch the workspace.
5. Top Right Toolbar: Settings & Extras
Top right, left to right: buy credits, help (open guide), calendar, notification bell (system alerts), language switch, and the gear icon. The gear opens settings: member info, organization info (upload company logo/stamp), notification settings, staff management, billing & purchases.
6. Account & Branch Switching: Seamlessly switch between multiple products or branches.
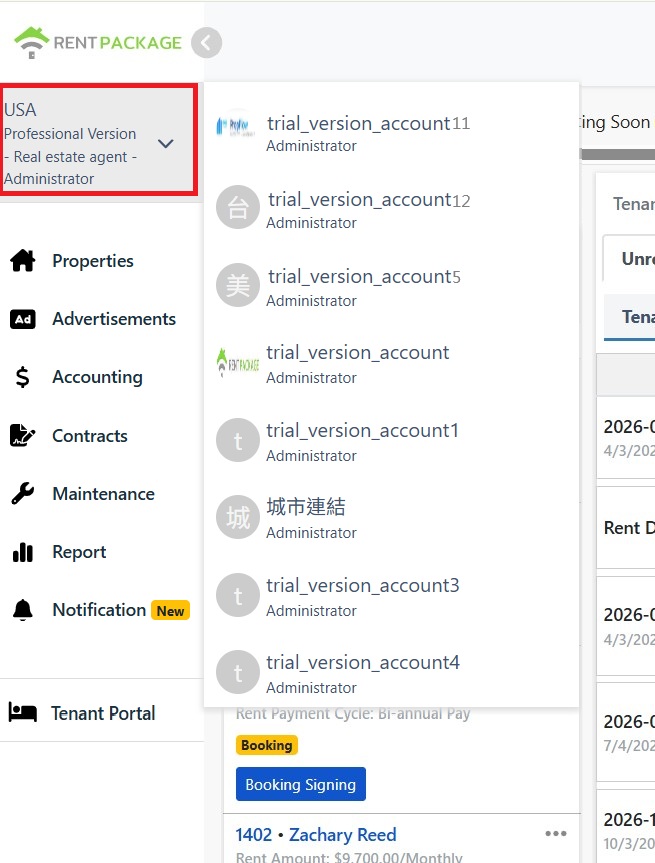
If you've purchased multiple products or manage multiple branches, click the account block at the top left, which shows your current company, version, and role, to expand the account list and switch to another branch with one click. Each branch's properties, transactions, and members are separate, ensuring no data confusion upon switching.
7. Switch Tenant/Owner Portal
The bottom of the left menu provides access to the Tenant and Owner portals. If you are both an administrator and a tenant (renting housing) or an owner (entrusting property management), click the corresponding portal to switch directly to that identity's page to view your bills, contracts, and notifications without logging out or using a different account.
Switch back to the management interface from the same location.
Connecting six key areas: A typical workflow example.
Take a common daily collection as an example and walk through: Upon login, the status bar shows overdue payments. Click the overdue tab, and the left panel filters rooms with overdue payments. Select a room, load its tenant billing in the workspace, where overdue invoices are marked with red overdue days. Post payment receipt, clear the invoice, reducing the overdue count in the status bar. Understanding this flow helps you apply the same logic elsewhere: identify issues via the status bar, locate via the left panel, resolve in the workspace.
FAQ
Will my data from multiple branches get mixed up?
No. Each branch operates as a separate account with its own properties, transactions, members, and permissions switched via the account block. Only the selected branch's data is visible after switching.
What are the numbers in the status bar? What happens when I click them?
Numbers provide real-time status stats, like overdue 111 indicating 111 rooms with overdue payments. Clicking a tab filters the left panel list to show rooms of that status; clicking 'All' restores the full list.
Why doesn't my screen exactly match the screenshots?
Menu items vary based on your purchased version and the role chosen upon object creation. For example, a DIY landlord won't use the owner portal. However, area locations and operation logic remain consistent, and the outlined workflow applies to all versions.